Introduction
Thanks for purchasing our theme! We hope you build a great website which you're happy with using this theme. If you'd like to support us by leaving a rating for the theme on Themeforest it'd be much appreciated!
Getting Support
We hope you find this documentation useful in the setup and use of the theme, however if you do run into any problems please don't hesitate to open a support ticket on a dedicated forum and we'll be happy to assist with any questions you have: https://quitenicestuff.ticksy.com
Technical Requirements
To install this theme you will need to have a working version of WordPress. The server requirements for running WordPress are as follows:
- PHP 5.6 or greater
- MySQL 5.6 or greater
- The mod_rewrite Apache module
For more information about server requirements please refer to the WordPress documentation here: https://wordpress.org/about/requirements/
Theme Installation
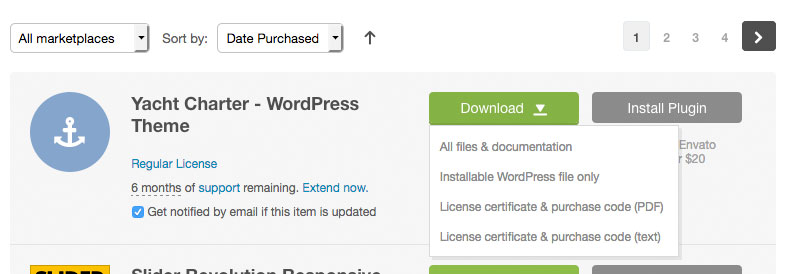
After purchasing the theme you will be presented with two different options for downloading the files, "All Files & Documentation" or "Installable WordPress file only". If you select "All Files & Documentation" you will need to unzip this package to access the WordPress installation file.
Method 1: Via The WordPress Dashboard (Easier)
- Unzip the package you downloaded from Themeforest, inside you will find a folder called Theme and inside this you will find a file called yachtcharter.zip
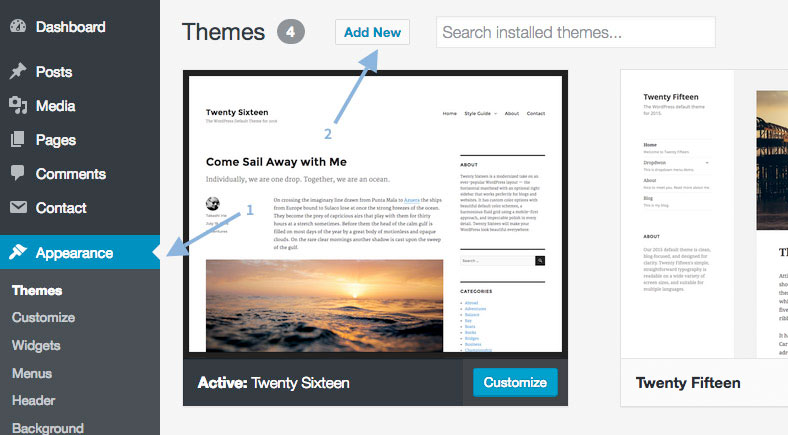
- Login to your WordPress dashboard and go to Appearance > Themes click on the Install Themes tab and select Upload
- Click the Browse button and find the yachtcharter.zip file
- After the theme has successfully uploaded click Activate and you're done!
Method 2: Via FTP
- Unzip the package you downloaded from Themeforest, inside you will find a folder called Theme and inside this you will find a folder called yachtcharter
- Login to your web server via FTP and browse to wp-content/themes and upload the yachtcharter folder here
- Login to your WordPress dashboard and go to Appearance > Themes the Yacht Charter theme will be visible, click Activate and you're done!
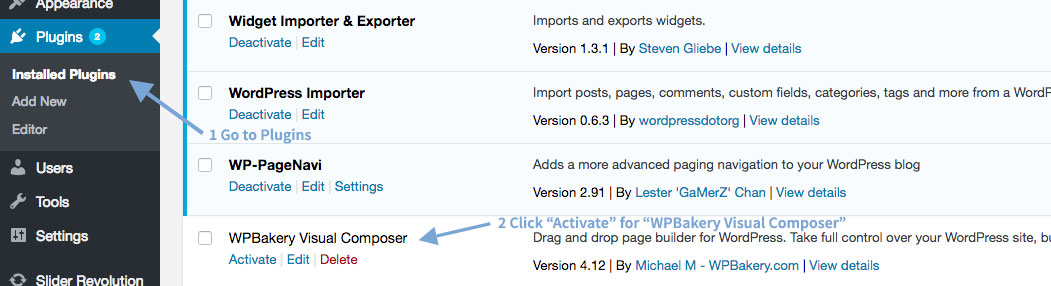
Plugin Installation
The theme requires the following plugins to function correctly: QNS Yacht Charter Shortcodes & Post Types, Redux Framework, Slider Revolution, Visual Composer, Contact Form 7, Simple Twitter Tweets, WordPress Importer, Widget Importer & Exporter and WordPress PageNavi.
Step 1: Installing The Plugins
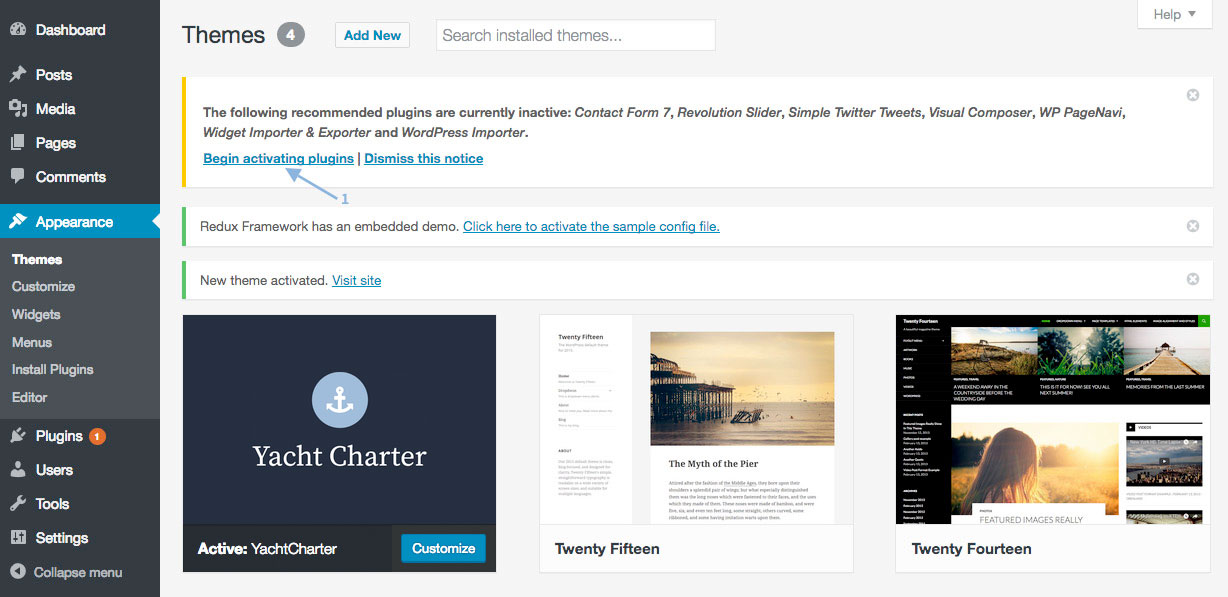
Upon activating the theme a message will appear stating This theme requires the following plugins and This theme recommends the following plugins, click on Begin installing plugins to continue
Step 2: Activating The Plugins
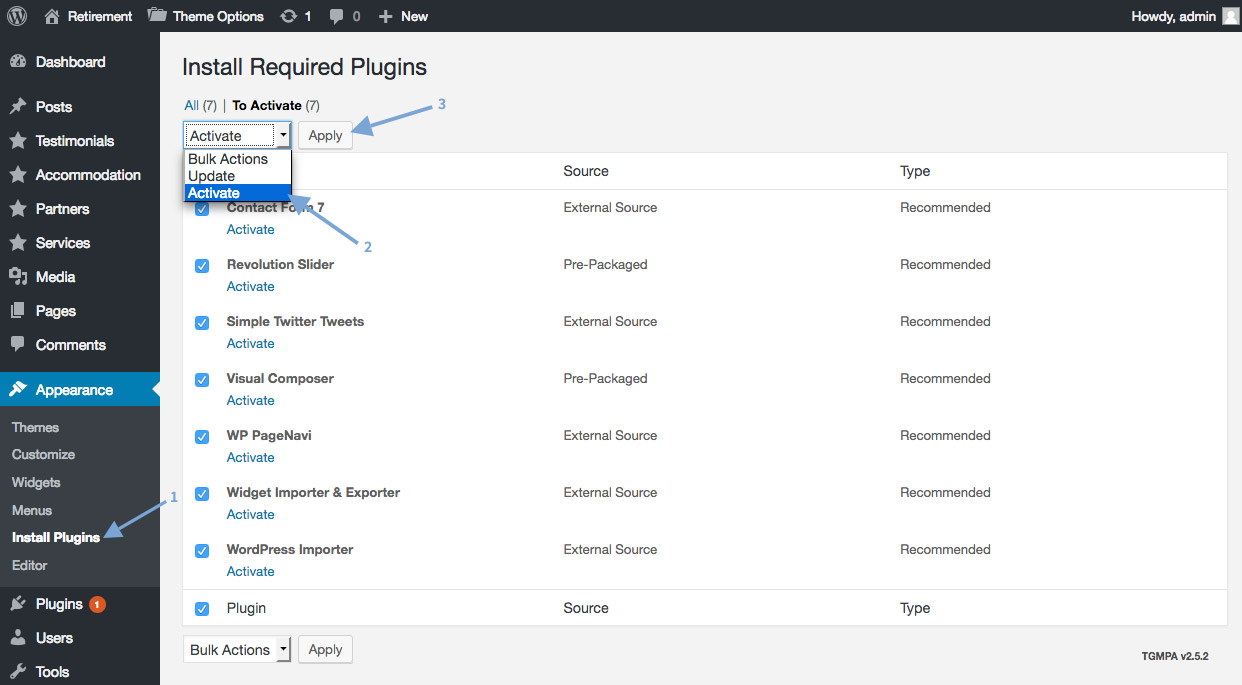
Check all the boxes next to each plugin, select Install from the Bulk Actions drop down and click Apply
Import Data
The theme requires the following plugins to function correctly: QNS Yacht Charter Shortcodes & Post Types, Redux Framework, Slider Revolution, Visual Composer, Contact Form 7, Simple Twitter Tweets, WordPress Importer, Widget Importer & Exporter and WordPress PageNavi.
Step 1: Import The Core Data
To import the core data, go to Tools > Import, click WordPress
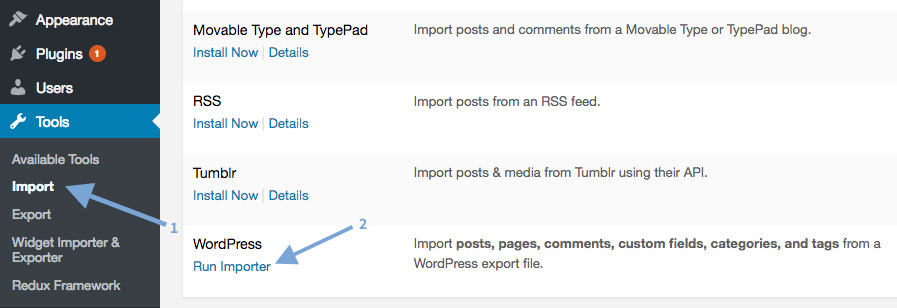
Click Browse and find the yachtcharter.xml file inside the Import Data folder inside the main download package. Then click the Upload file and import button.
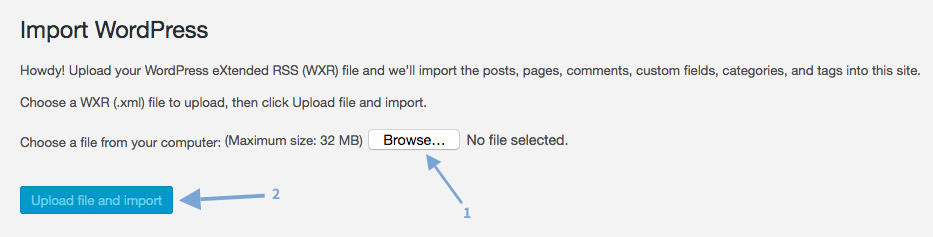
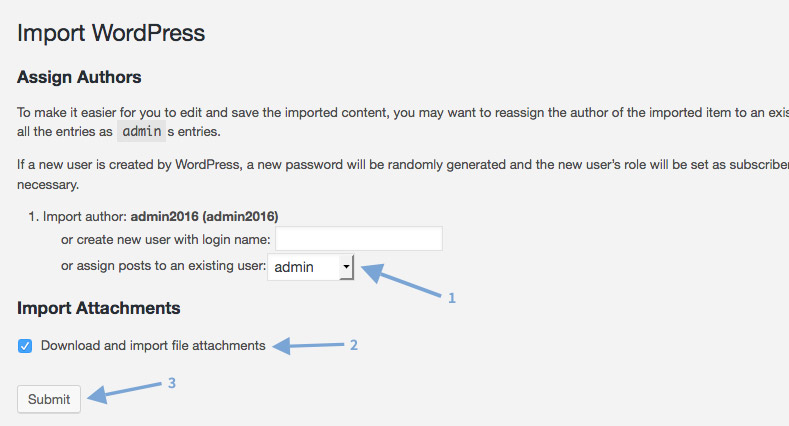
For Import author: admin (admin) select or assign posts to an existing user: and choose your username from the drop down menu selection. Make sure you select the Download and import file attachments option
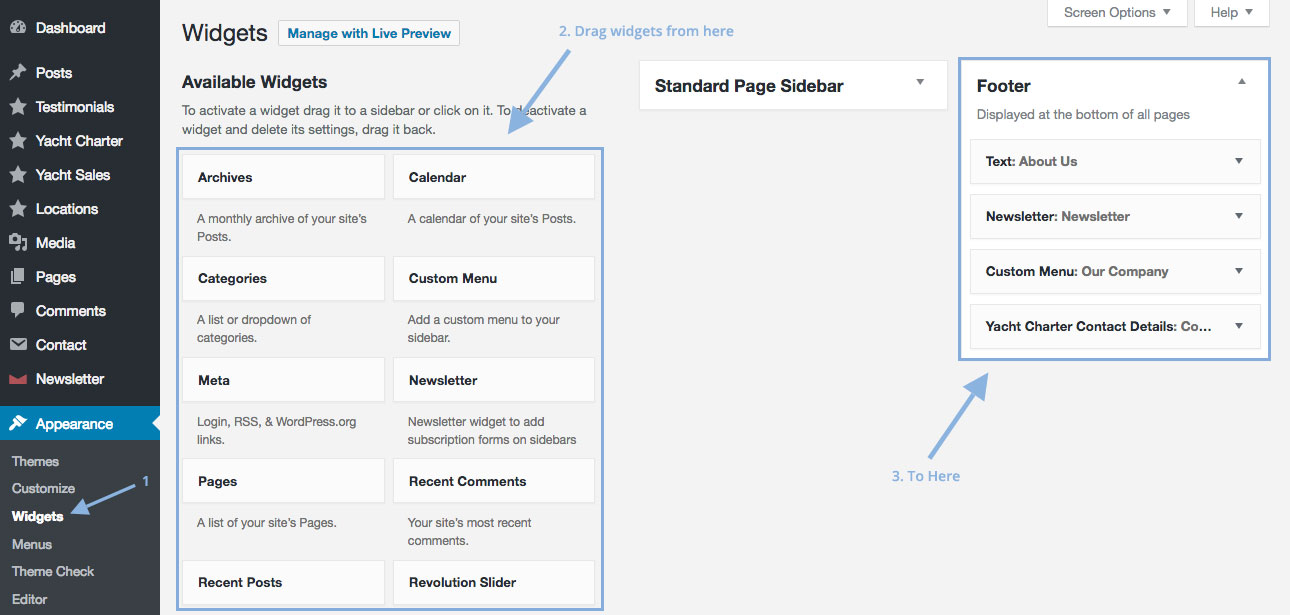
Step 2: Import Widgets
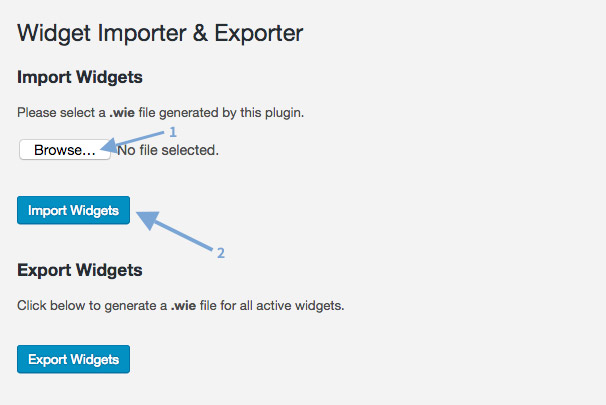
Make sure you have the Widget Importer & Exporter plugin activated, then go to Tools > Widget Importer & Exporter, then click Browse and select the yachtcharter.wie file inside the Import Data folder inside the main download package. Next click on Import Widgets to import the widgets
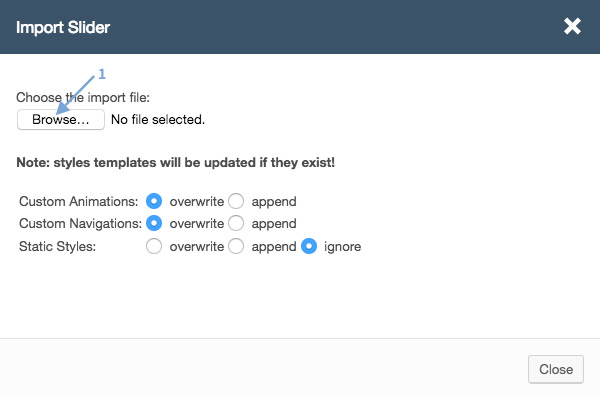
Step 3: Import Slides
Make sure you have the Slider Revolution plugin activated, then go to Slider Revolution, and click Import Slider
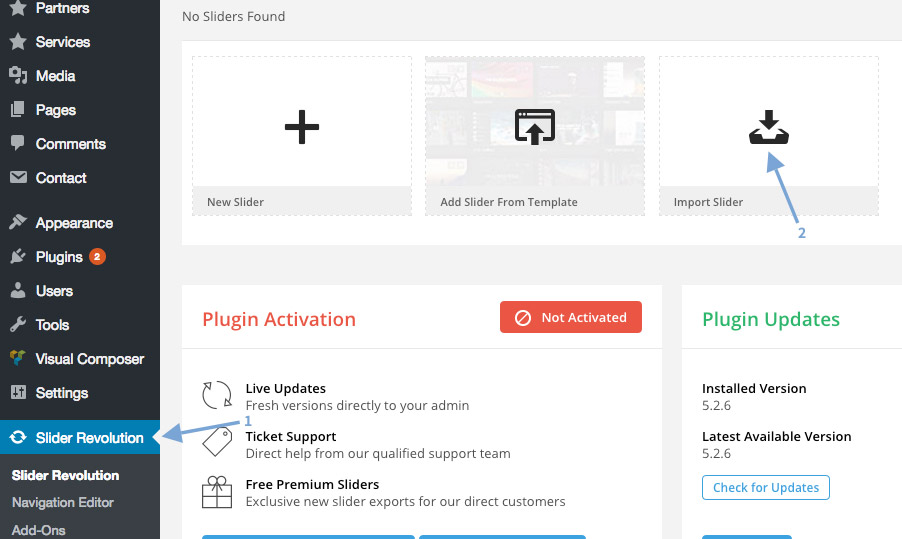
Click Browse and select the slider-home.zip or slider-accommodation.zip files found inside the Import Data folder inside the main download package (you will need to import both files separately)
Theme Updates
It is recommended that you backup your website before updating just to be safe
- Go to your downloads page on Themeforest
- Click the Download button and choose All files & Documentation
- Unzip the file you downloaded and you will have a folder called theme and inside this a folder called yachtcharter
- Login to your web server via FTP and upload the yachtcharter folder to wp-content/themes
- If you get a message similar to Destination folder already exists delete the old theme folder or select to overwrite it (don't worry, you won't lose any of your website data)
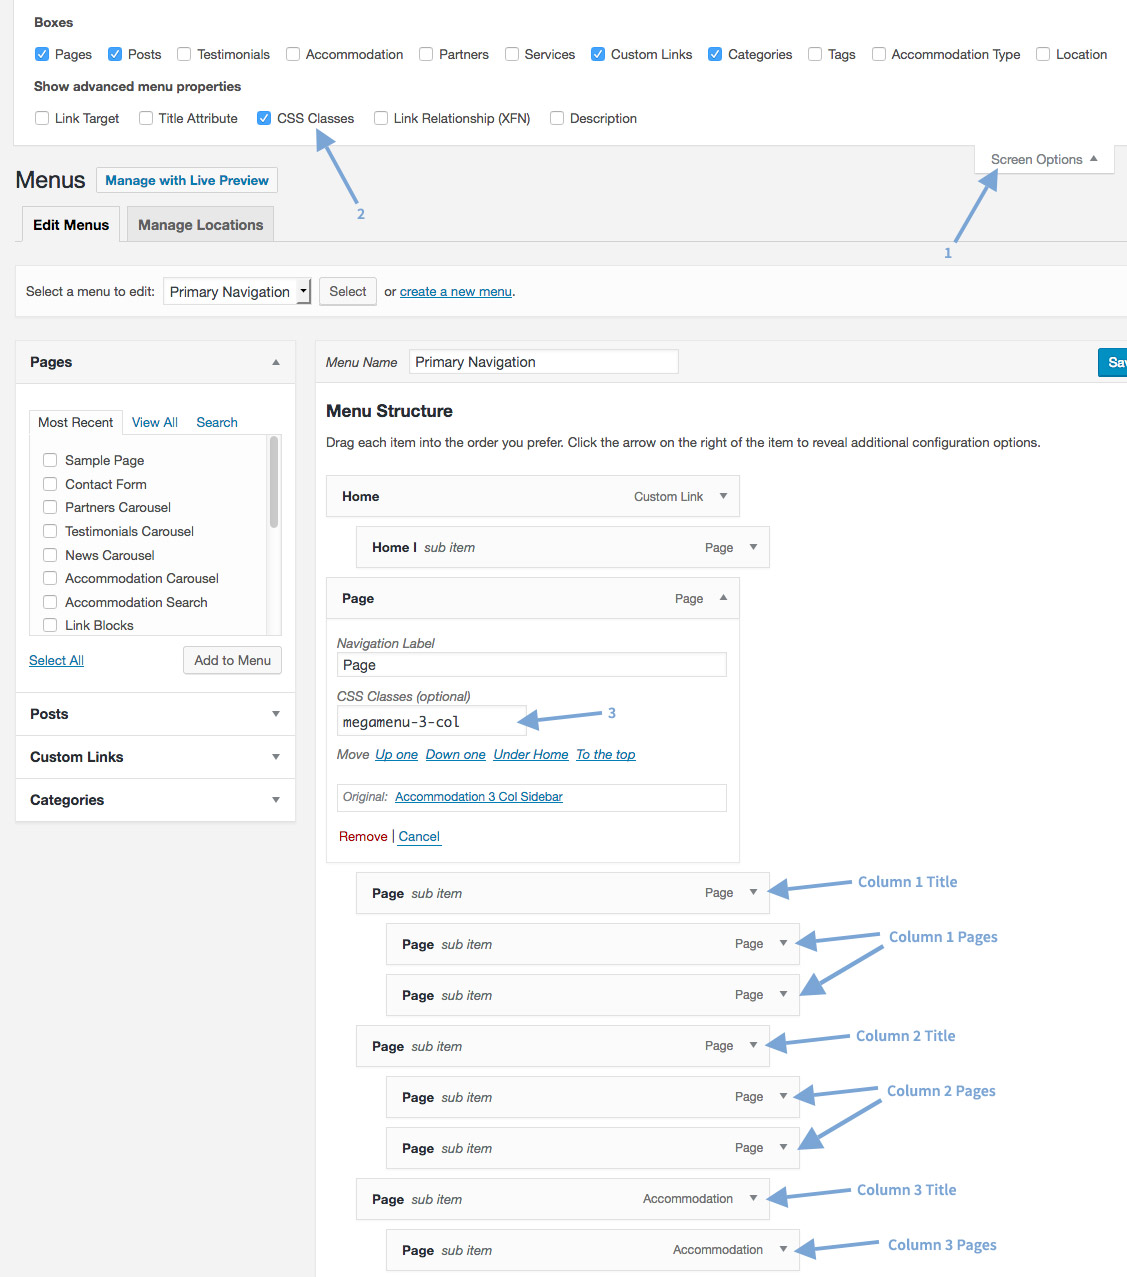
Creating The Main Menu
You can begin creating the menu by going to "Appearance > Menus".

Setting Up A Multi-Column Menu
You can set a 2, 3, 4 or 5 column menu by adding the following classes in the "CSS Classes" field: "megamenu-2-col" (2 Columns), "megamenu-3-col" (3 Columns), "megamenu-4-col" (4 Columns) or "megamenu-5-col" (5 Columns)
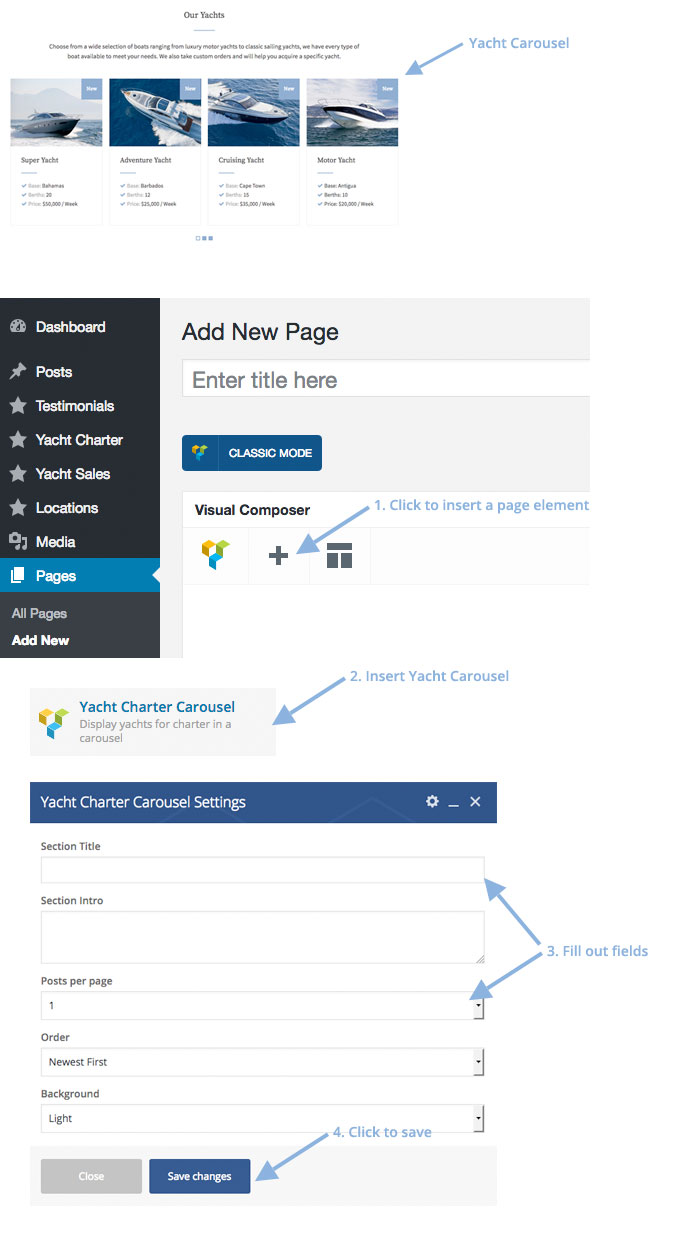
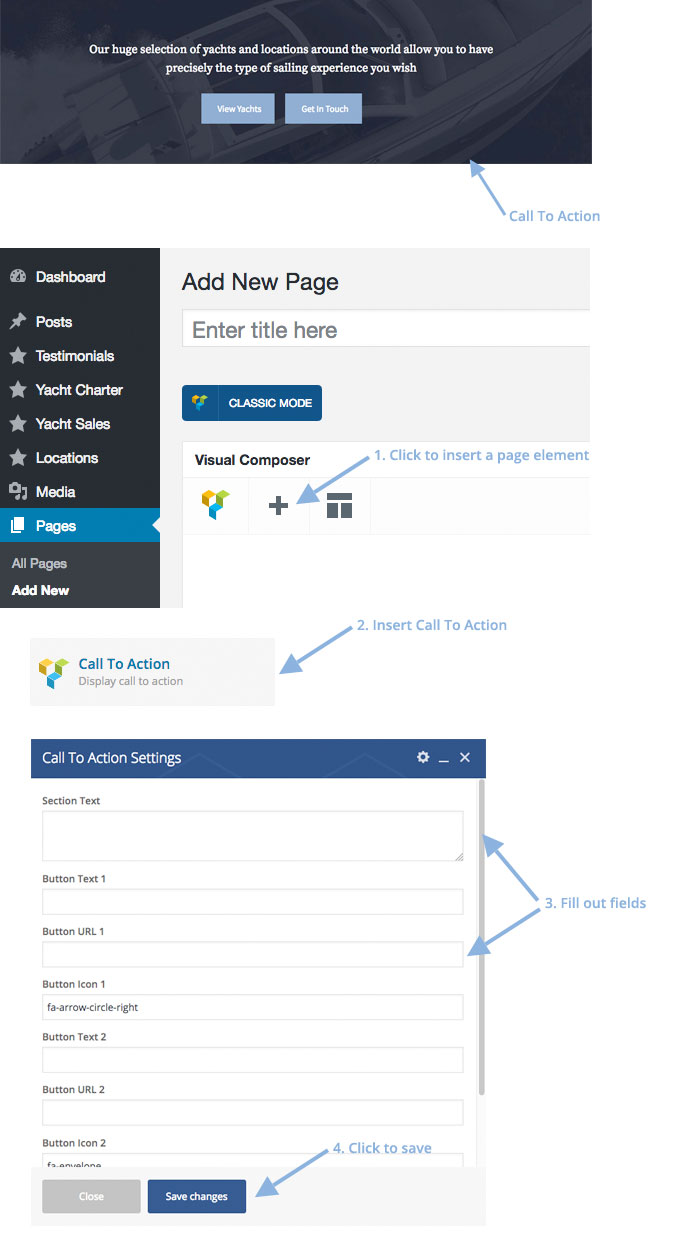
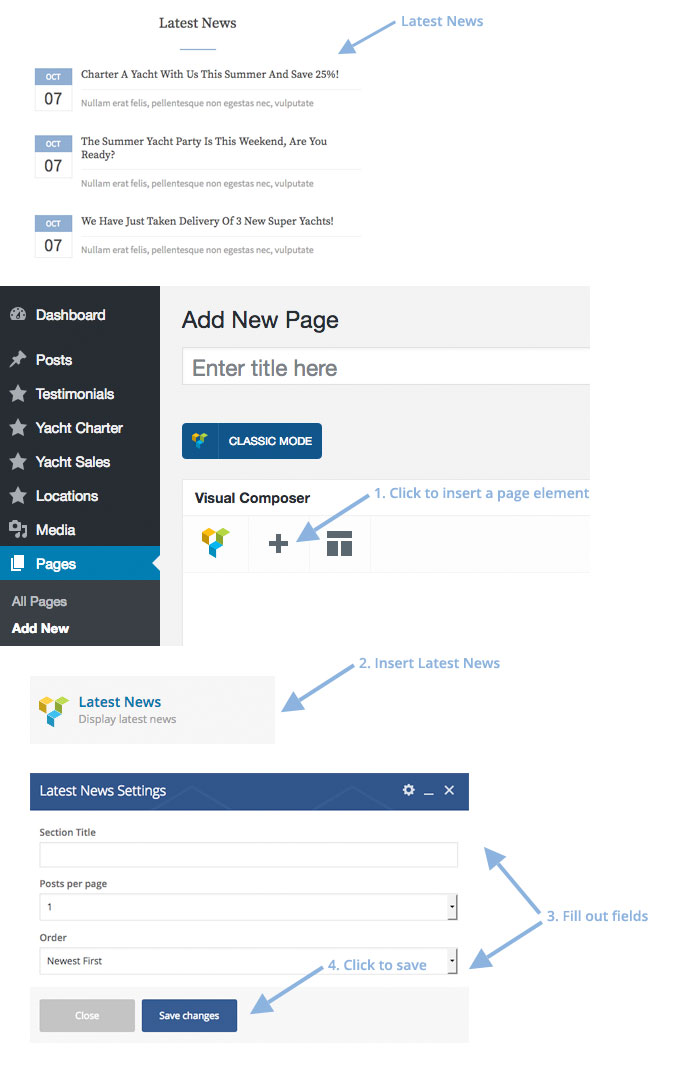
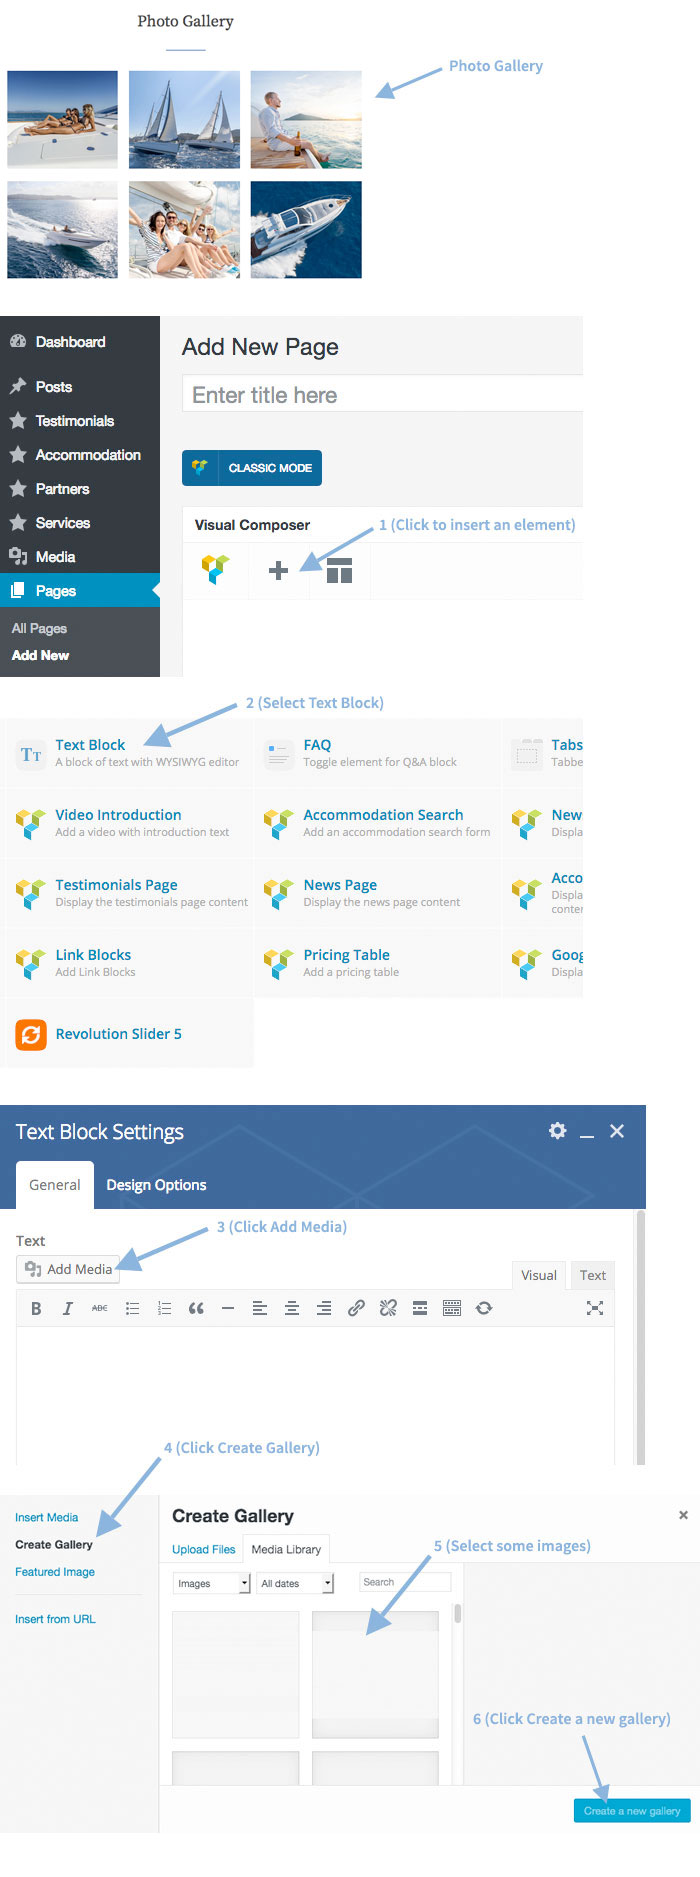
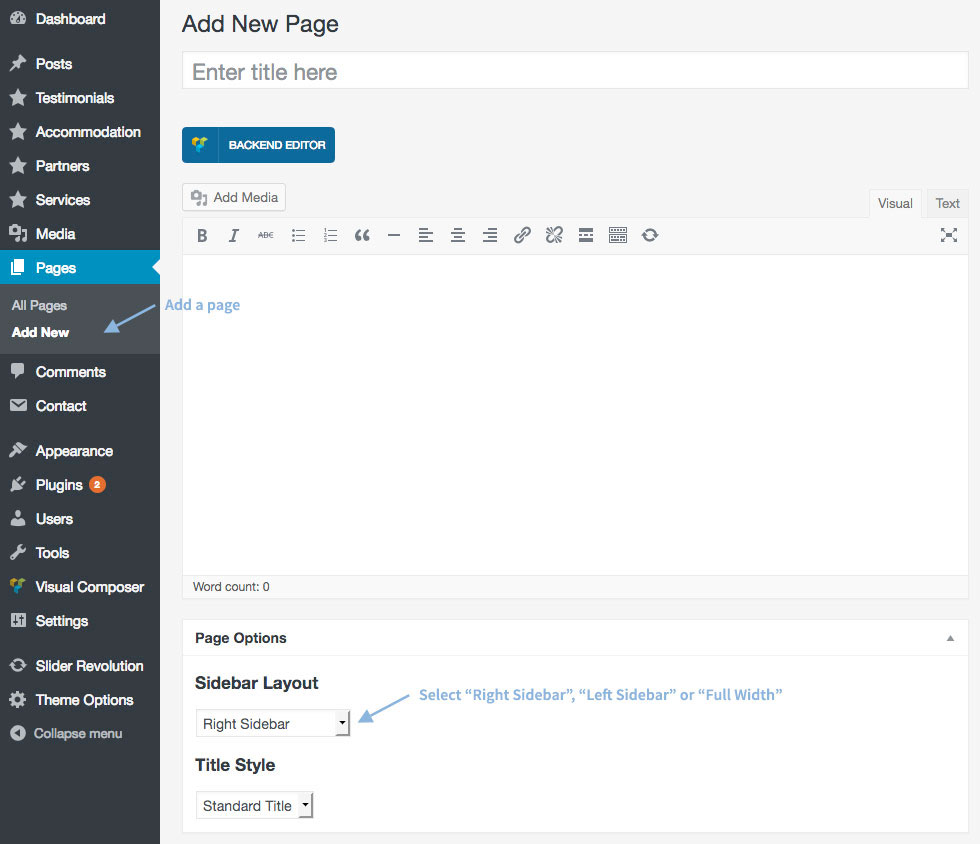
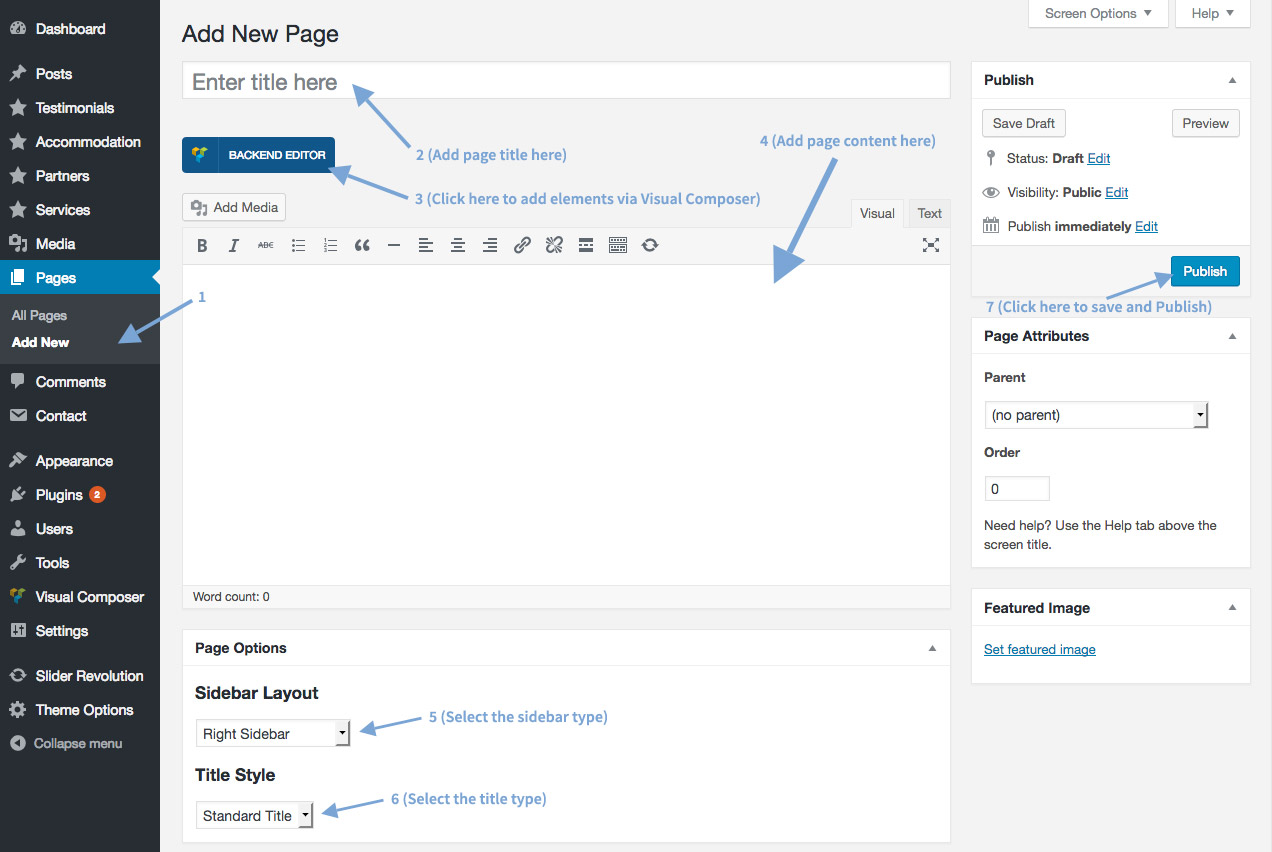
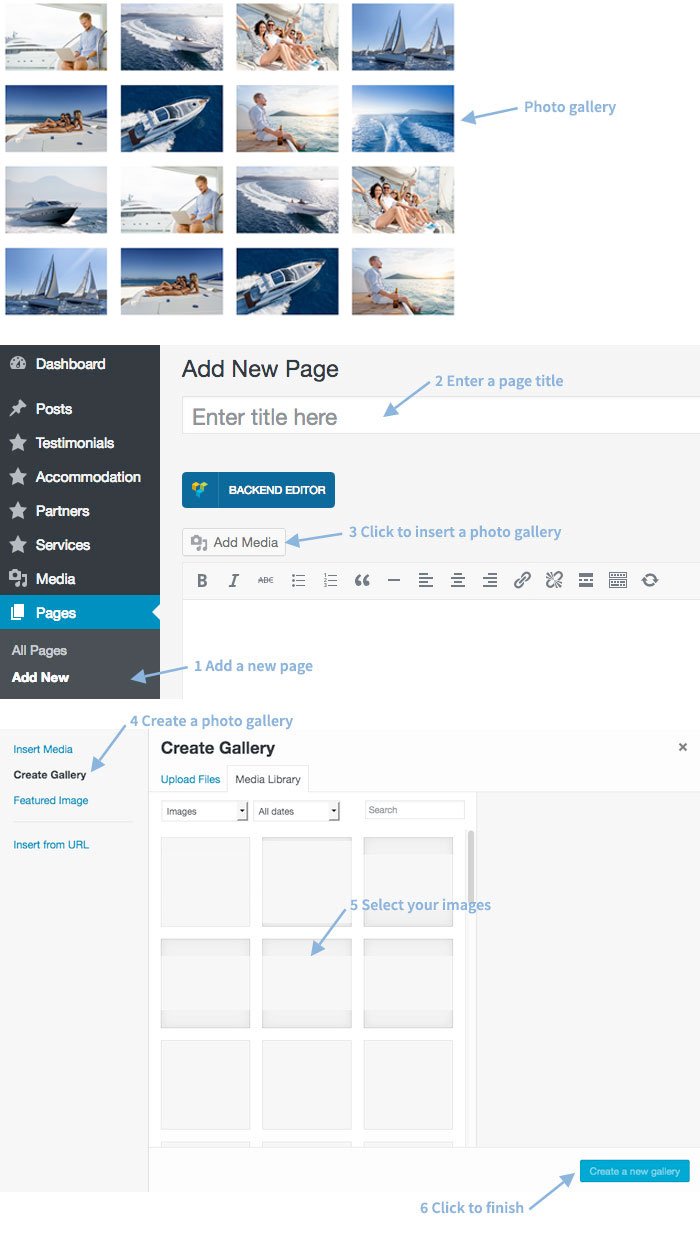
Creating A New Page
To create a new page go to "Pages > Add New".
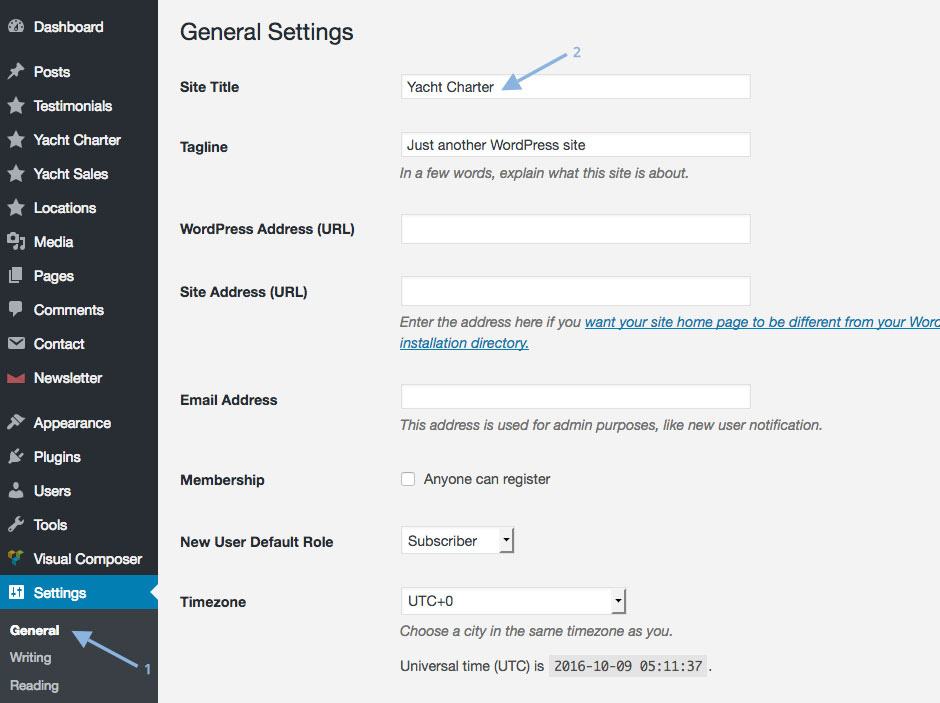
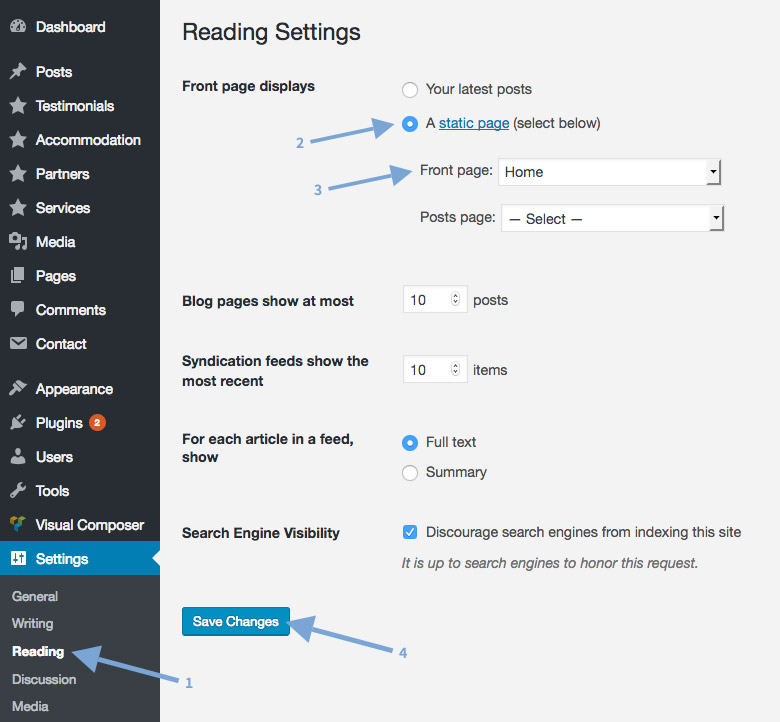
Set The Homepage
You can set the homepage (the first page shown when people visit your website) by going to "Settings > Reading", and for "Front page displays" select "A static page (select below)" and choose your homepage from the "Front page" drop down.
Create The Yacht Charter Page
There are two steps for creating the yacht charter section, first creating the yacht charter listing page, and then adding the yachts to that page.
Step 1: Creating The Yacht Charter Listing Page
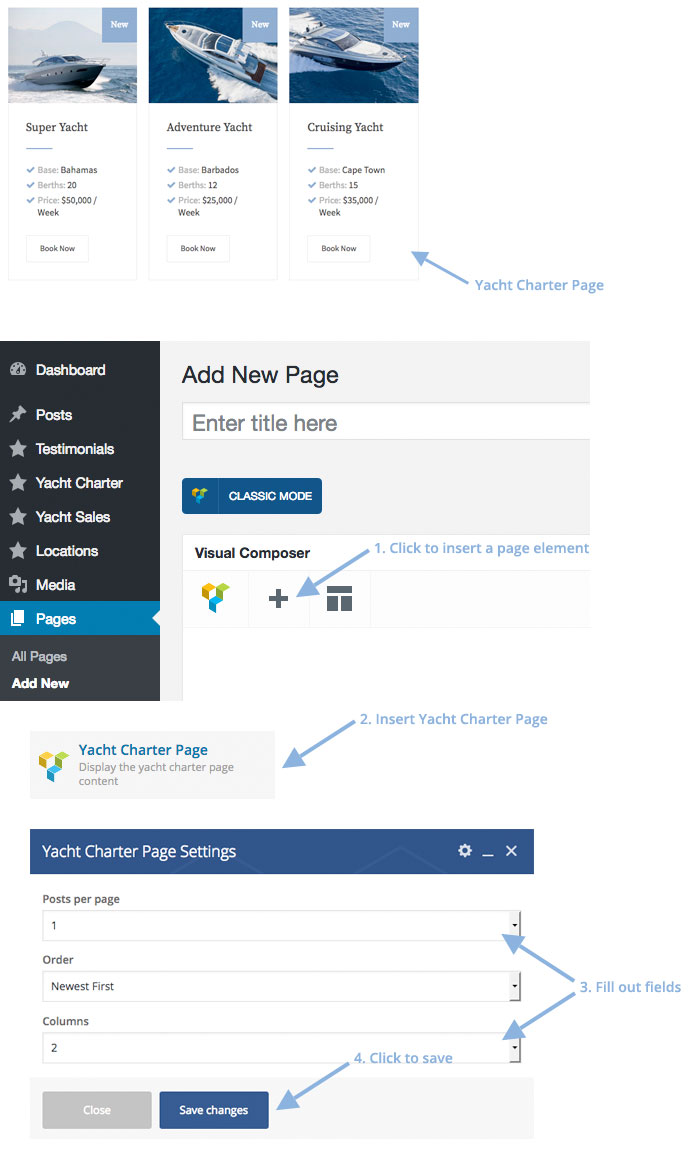
Step 2: Adding Yachts
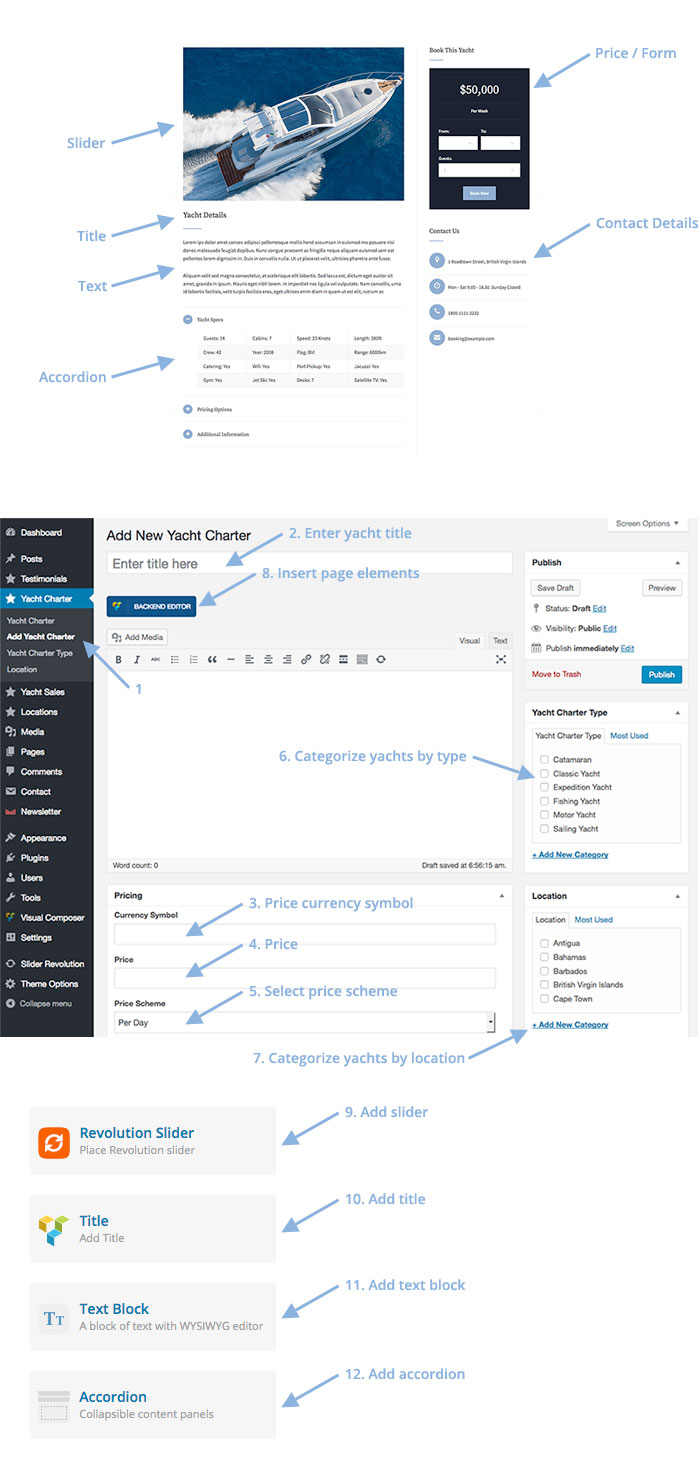
The "Yacht Specs" Table Code
<table>
<tbody>
<tr>
<td data-title="Column 1">Guests: 14</td>
<td data-title="Column 1">Cabins: 7</td>
<td data-title="Column 1">Speed: 23 Knots</td>
<td data-title="Column 1">Length: 390ft</td>
</tr>
<tr>
<td data-title="Column 2">Crew: 42</td>
<td data-title="Column 2">Year: 2008</td>
<td data-title="Column 2">Flag: BVI</td>
<td data-title="Column 2">Range: 6000km</td>
</tr>
<tr>
<td data-title="Column 3">Catering: Yes</td>
<td data-title="Column 3">Wifi: Yes</td>
<td data-title="Column 3">Port Pickup: Yes</td>
<td data-title="Column 3">Jacuzzi: Yes</td>
</tr>
<tr>
<td data-title="Column 4">Gym: Yes</td>
<td data-title="Column 4">Jet Ski: Yes</td>
<td data-title="Column 4">Decks: 7</td>
<td data-title="Column 4">Satellite TV: Yes</td>
</tr>
</tbody>
</table>
Create The Yacht Sales Page
There are two steps for creating the yacht sales section, first creating the yacht sales listing page, and then adding the yachts to that page.
Step 1: Creating The Yacht Sales Listing Page
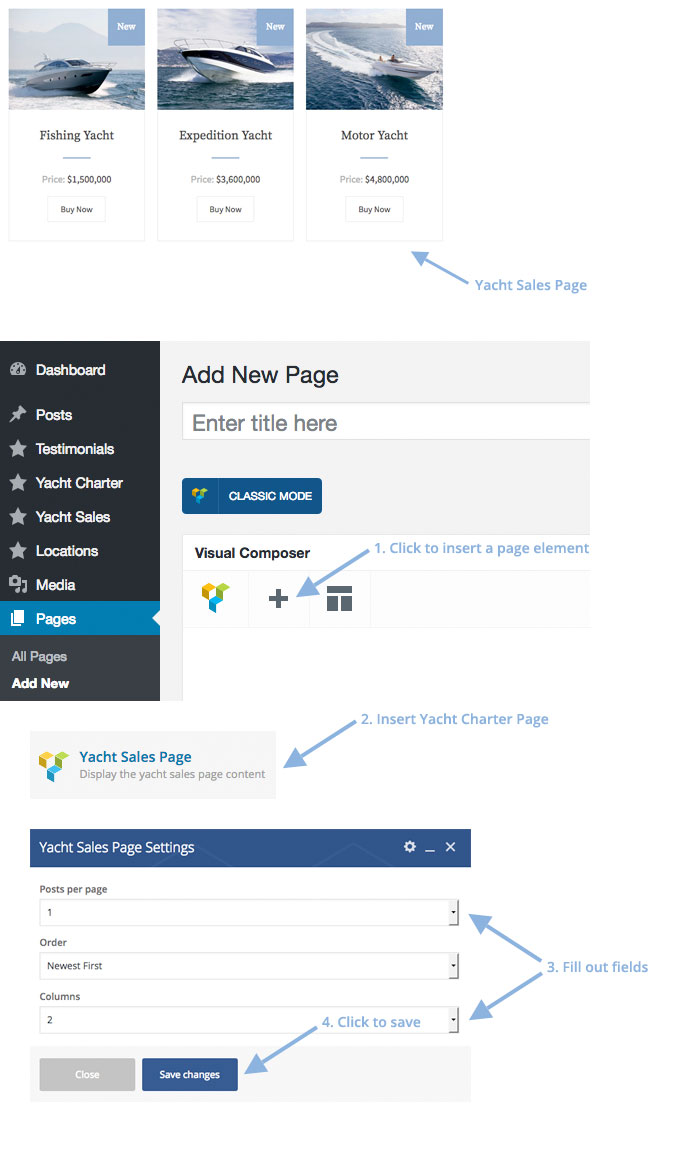
Step 2: Adding Yachts
The "Yacht Specs" Table Code
<table>
<tbody>
<tr>
<td data-title="Column 1">Guests: 14</td>
<td data-title="Column 1">Cabins: 7</td>
<td data-title="Column 1">Speed: 23 Knots</td>
<td data-title="Column 1">Length: 390ft</td>
</tr>
<tr>
<td data-title="Column 2">Crew: 42</td>
<td data-title="Column 2">Year: 2008</td>
<td data-title="Column 2">Flag: BVI</td>
<td data-title="Column 2">Range: 6000km</td>
</tr>
<tr>
<td data-title="Column 3">Catering: Yes</td>
<td data-title="Column 3">Wifi: Yes</td>
<td data-title="Column 3">Port Pickup: Yes</td>
<td data-title="Column 3">Jacuzzi: Yes</td>
</tr>
<tr>
<td data-title="Column 4">Gym: Yes</td>
<td data-title="Column 4">Jet Ski: Yes</td>
<td data-title="Column 4">Decks: 7</td>
<td data-title="Column 4">Satellite TV: Yes</td>
</tr>
</tbody>
</table>
Yacht form options code
<option value="400ft">400ft</option>
<option value="450ft">450ft</option>
<option value="500ft">500ft</option>
<option value="550ft">550ft</option>
<option value="600ft">600ft</option>
<option value="650ft">650ft</option>
<option value="700ft">700ft</option>
<option value="750ft">750ft</option>
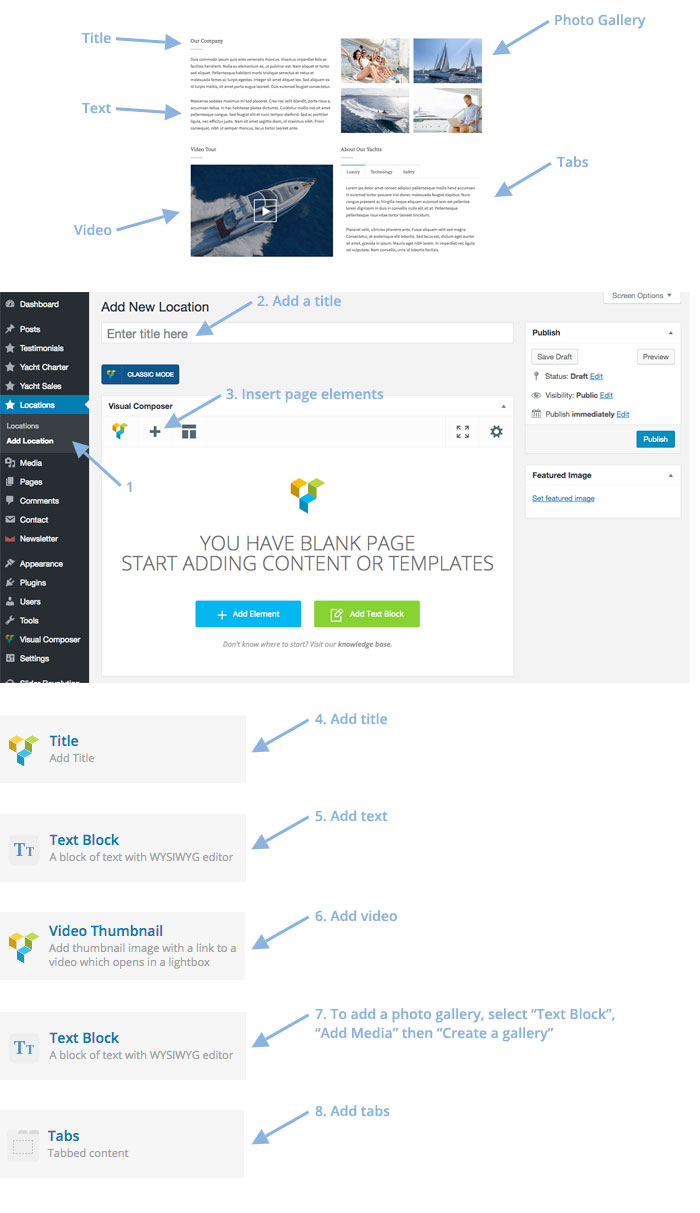
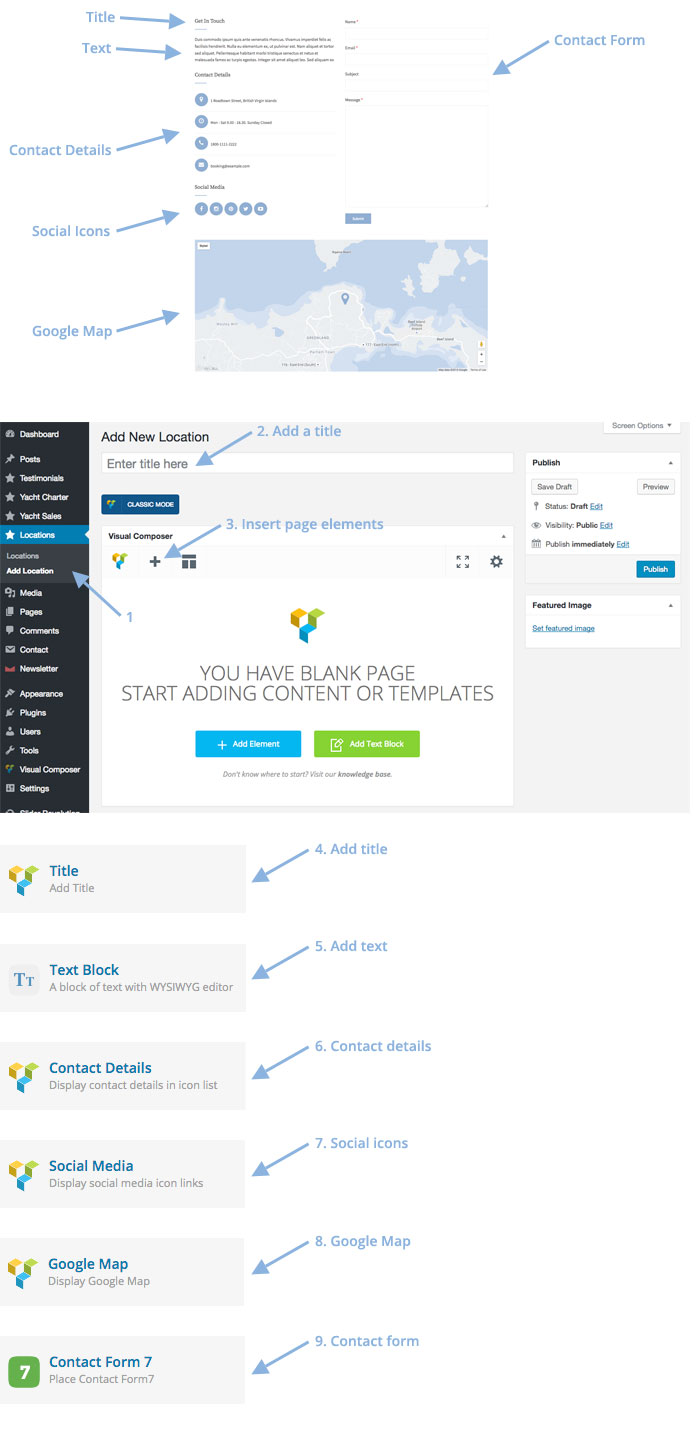
Create The Locations Page
There are two steps for creating the locations section, first creating the location listing page, and then adding the locations to that page.
Step 1: Creating The Location Listing Page
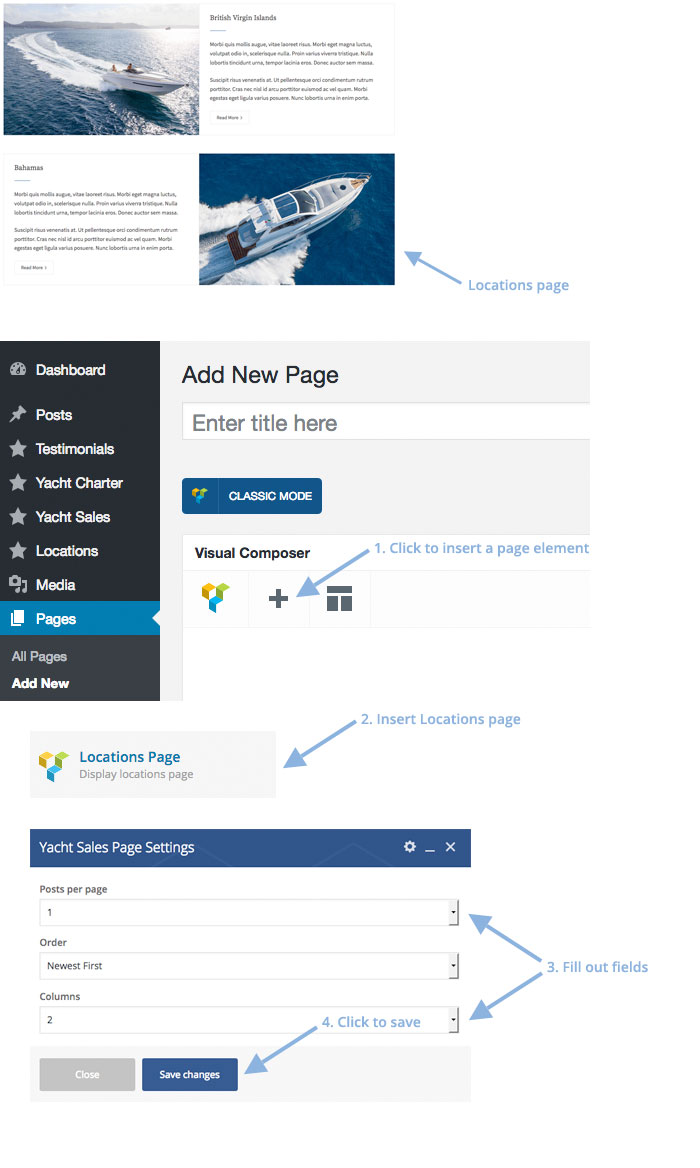
Step 2: Adding A Location

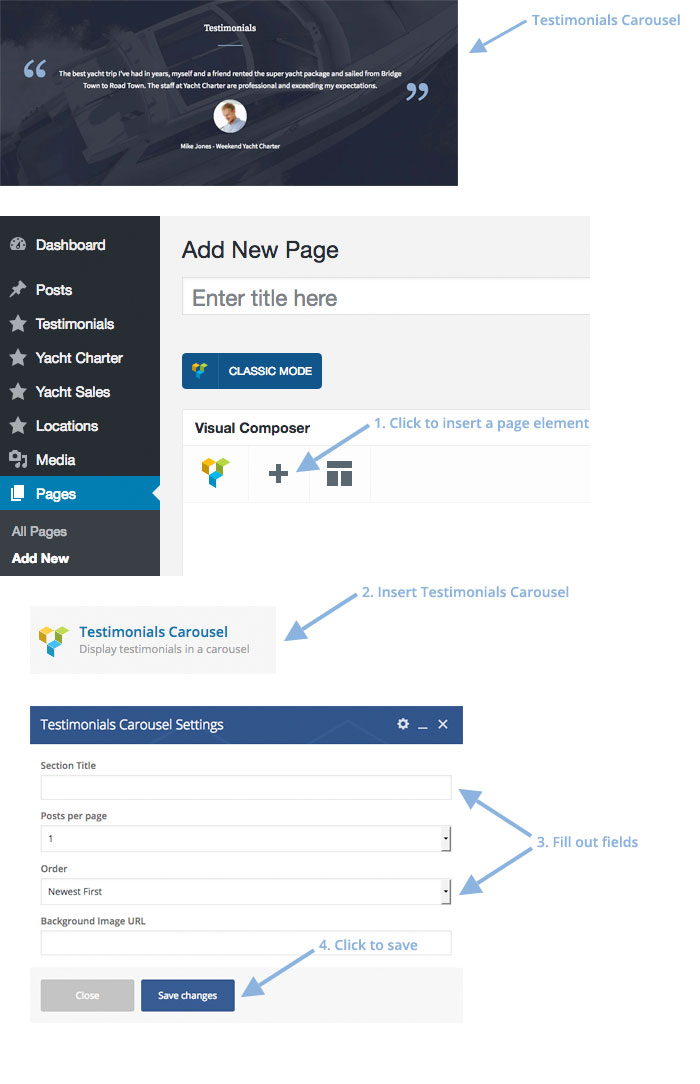
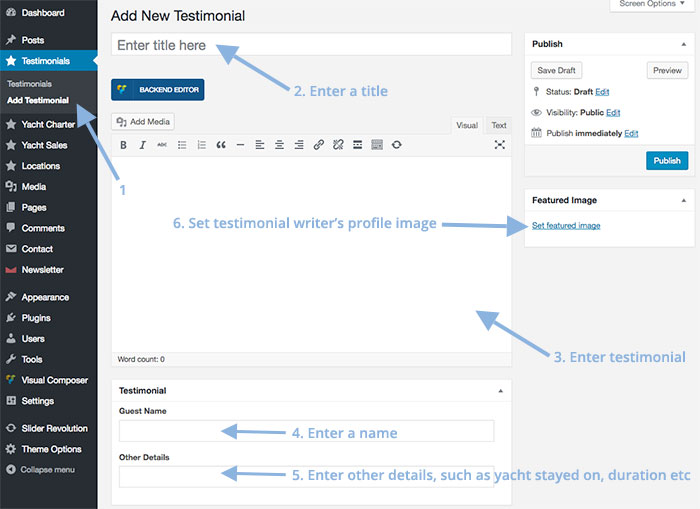
Create The Testimonials Page
There are two steps for creating the testimonials section, first creating the testimonial listing page, and then adding the testimonials to that page.
Step 1: Creating The Testimonial Listing Page
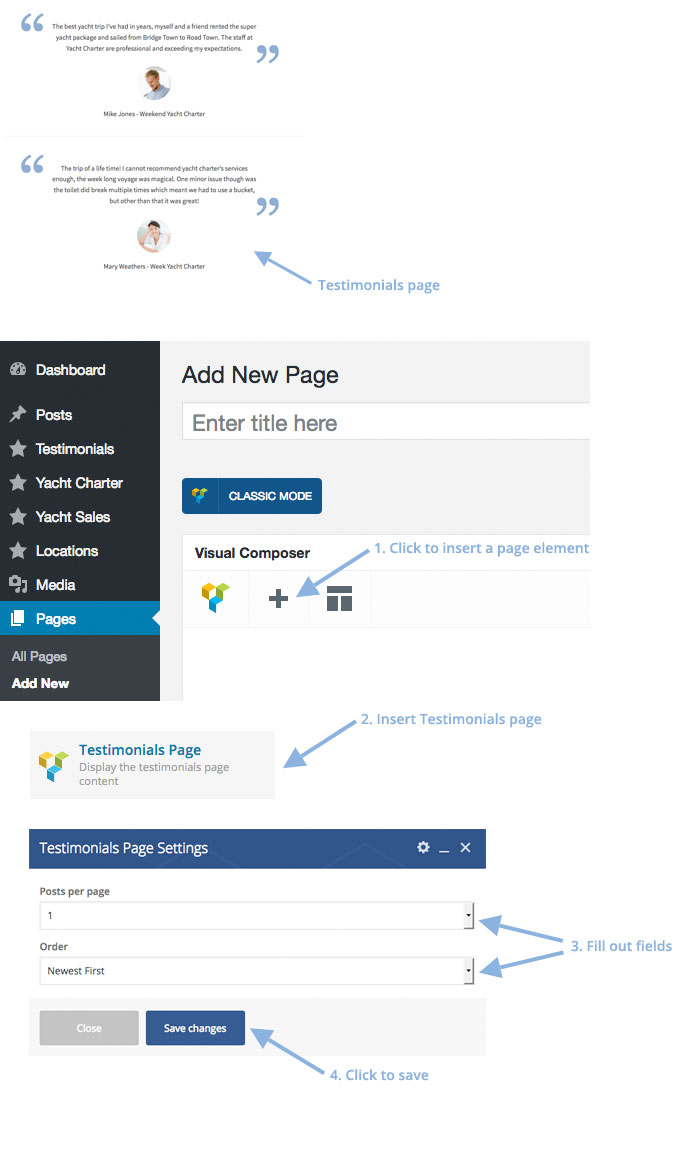
Step 2: Adding A Testimonial
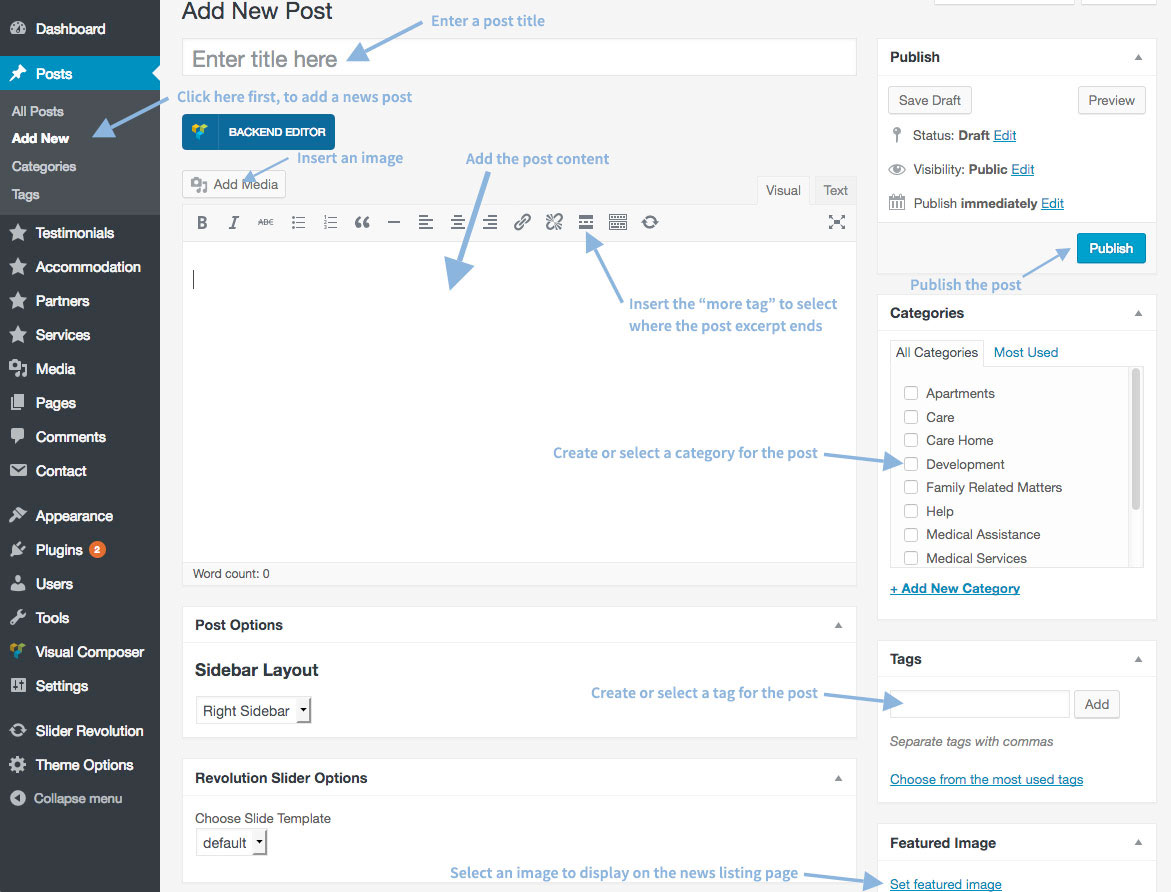
Create The News Page
There are two steps for creating the news section, first creating the news listing page, and then adding the news to that page.
Step 1: Creating The News Listing Page
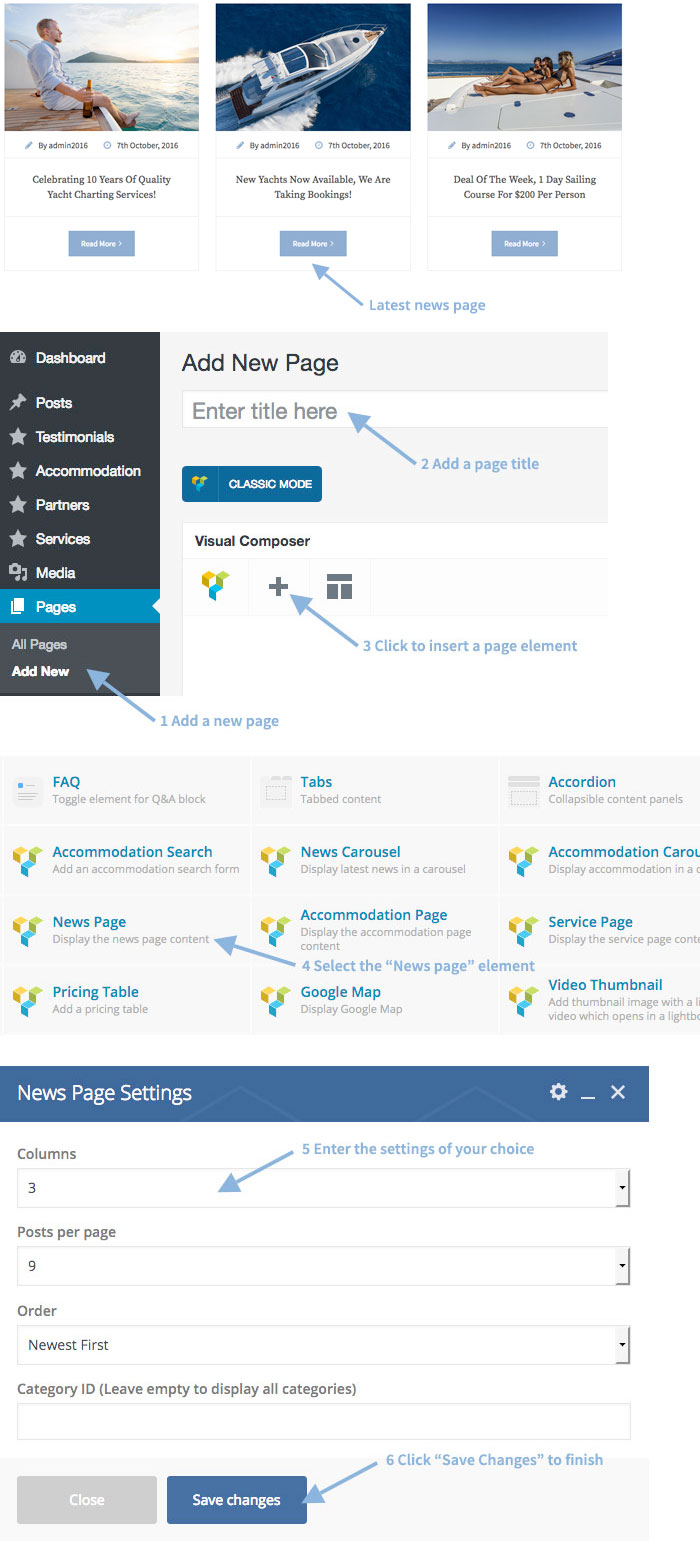
Step 2: Adding A News Post
Create The About Us Page
Create The Photo Gallery Page
Create The Contact Us Page
Code for the "Why choose us?" widget
<p>Lorem ips dolor amet consec adipisci pellentesque mollis hend accumsan in euismod tortor im posuere nisi donec malesuada feugiat dapibus nunc congue.</p>
[videothumbnail video_thumbnail_url="http://website.com/image.jpg" video_url="http://youtube.com/example" video_corner_text="Virtual Tour"]
Translation
You can translate the theme into a single language using the free version of PoEdit: http://poedit.net/. To translate into multiple languages you can use WPML: http://wpml.org/. There are two sets of language files, one for the theme and one for the plugin.
Translation Using PoEdit
Theme language files are stored in:
wp-content/themes/yachtcharter/framework/languages
And plugin language files are stored in:
wp-content/plugins/yachtcharter-shortcodes-post-types/languages
You can open the above mentioned files in PoEdit and make your translations - after that save the language files in the same folder you got them from as "yachtcharter-xx_XX" where "xx_XX" is your language code, e.g. for French use "yachtcharter-fr_FR". Then in WordPress go to "Settings > General" and set "Site Language" as your translated language.
Translation Using WPML
WPML has in depth documentation here: https://wpml.org/documentation/, they also have a great support forum here: https://wpml.org/forums/forum/english-support/.
How to change theme/plugin text
The easiest way to change the theme or plugin text is with PoEdit: http://poedit.net (You can use the free version). Although PoEdit is a language translation tool is can also be used to change text within the same language by "translating" English to English.
How to change theme text:
- Open the theme language pot file in PoEdit "yachtcharter/framework/languages"
- Edit all the text strings you want to change in PoEdit
- Save the file as "en_GB" in the same folder you originally got it from "yachtcharter/framework/languages"
- Login to WordPress and go to "Settings > General" and set "Site Language" to "English UK"
How to change plugin text:
- Open the plugin language pot file in PoEdit "yachtcharter-shortcodes-post-types/languages"
- Edit all the text strings you want to change in PoEdit
- Save the file as "yachtcharter-en_GB" in the same folder you originally got it from "yachtcharter-shortcodes-post-types/languages"
- Login to WordPress and go to "Settings > General" and set "Site Language" to "English UK"
Why not just edit text directly in the theme files?
This would make updating very difficult, since every time you update you would need to change all the text strings again - If you use PoEdit you do not encounter this problem.
Why are we saving the file as "en_GB" and setting the WordPress language as English UK?
The WordPress default language is English US but we need to switch to a different language so WordPress uses the language file you created. You don't have to use English UK if you don't want to, you can use any language which is not English US. Here's a list of all the language codes WordPress supports: https://make.wordpress.org/polyglots/teams
Why are we naming the language files differently for theme and plugin translation?
This is just the way WordPress works, when you translate a theme you should save the file as "xx_XX" and when you translate a plugin you should save it as "pluginname-xx_XX".
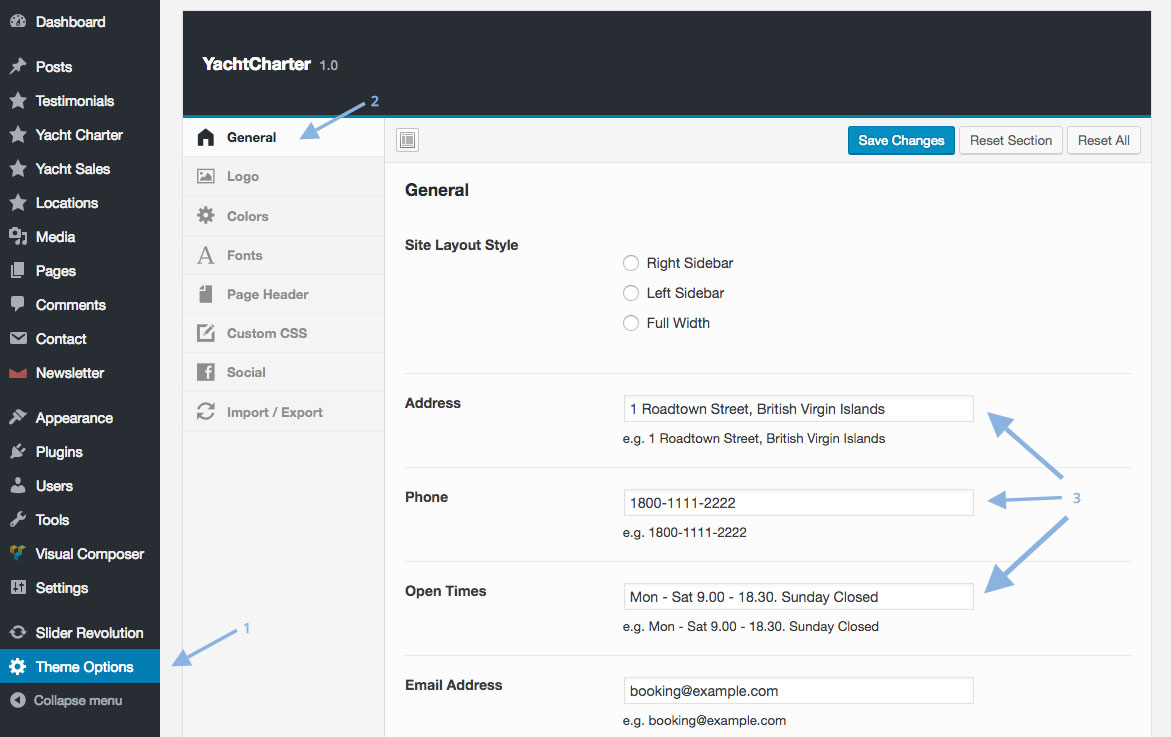
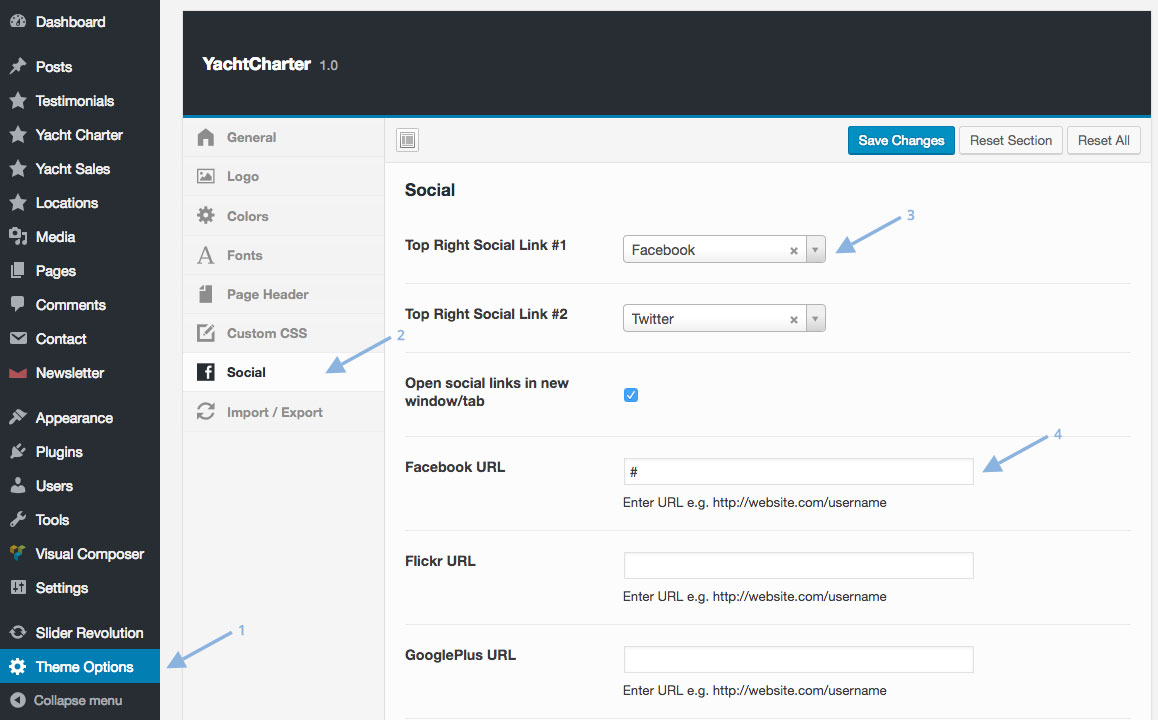
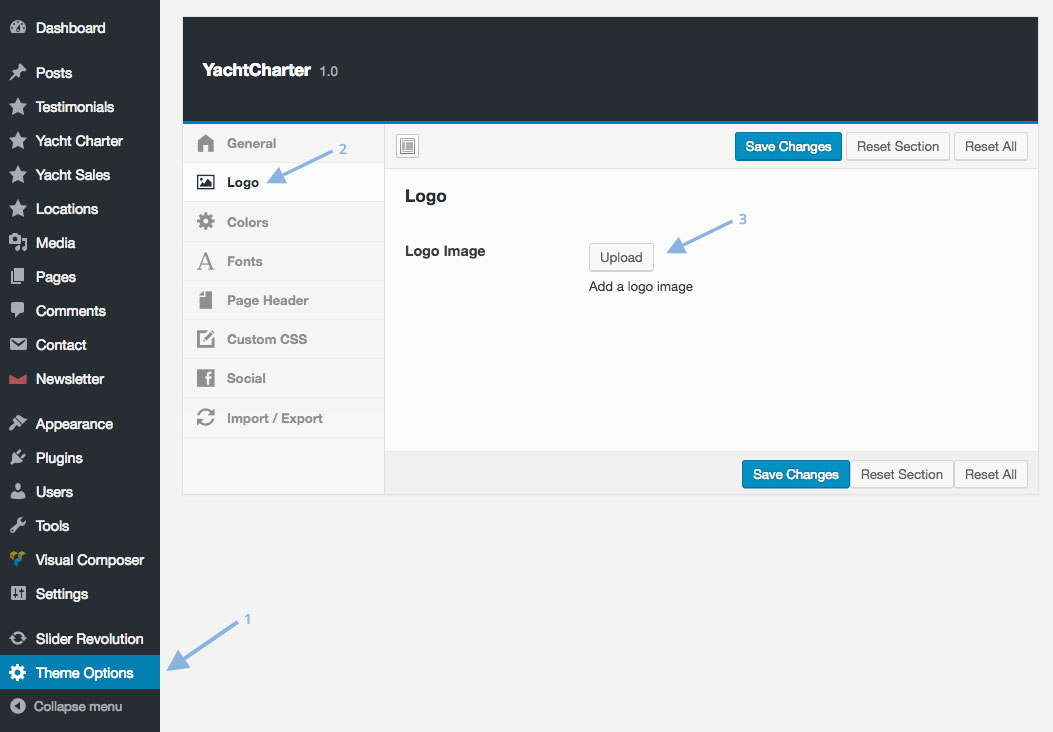
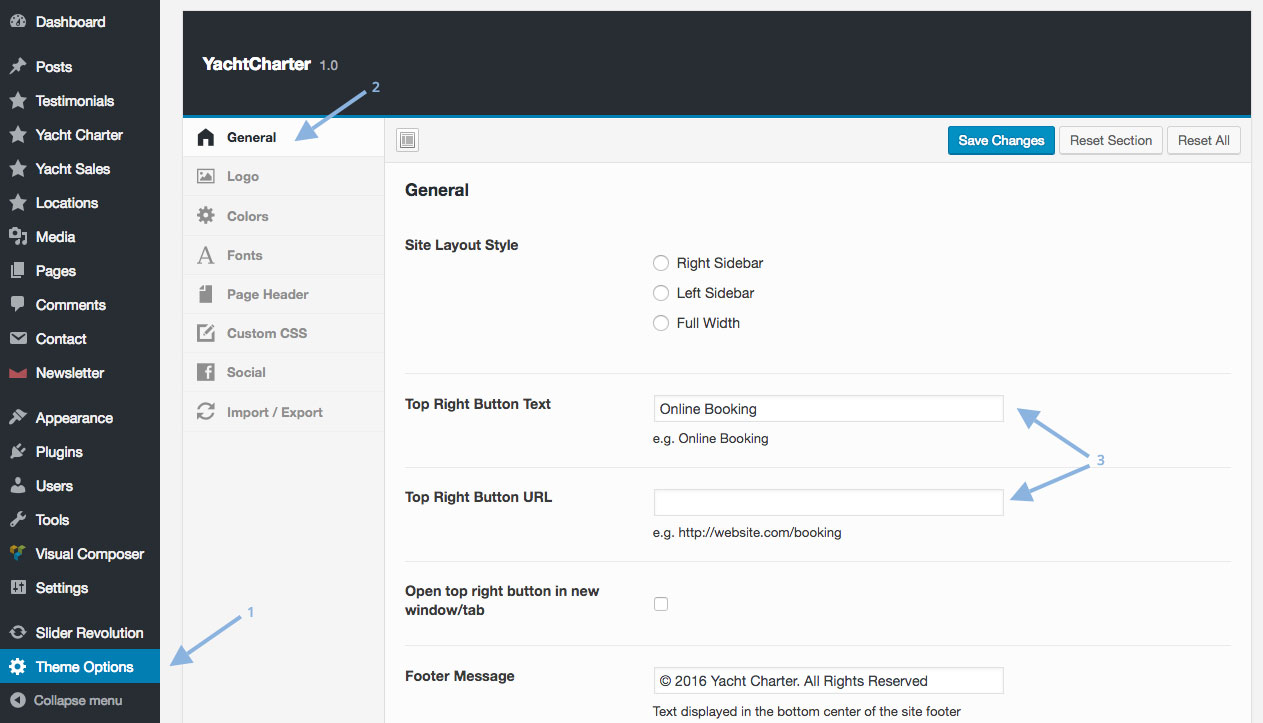
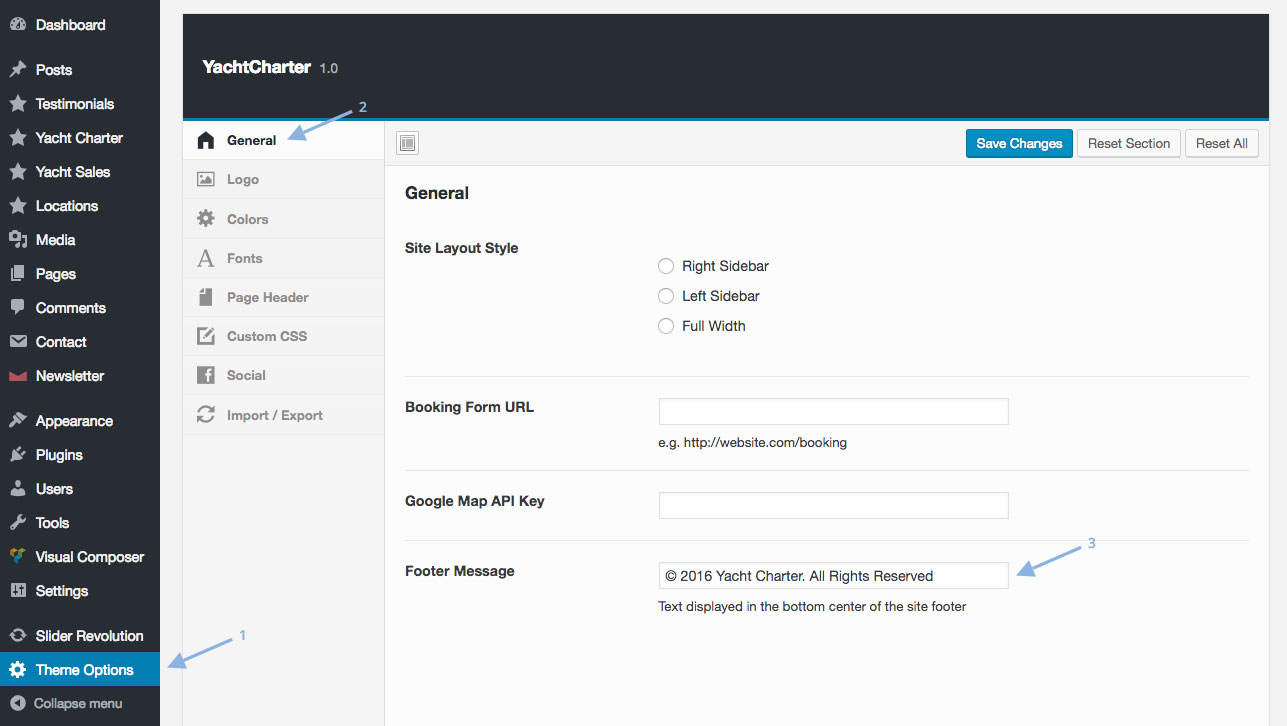
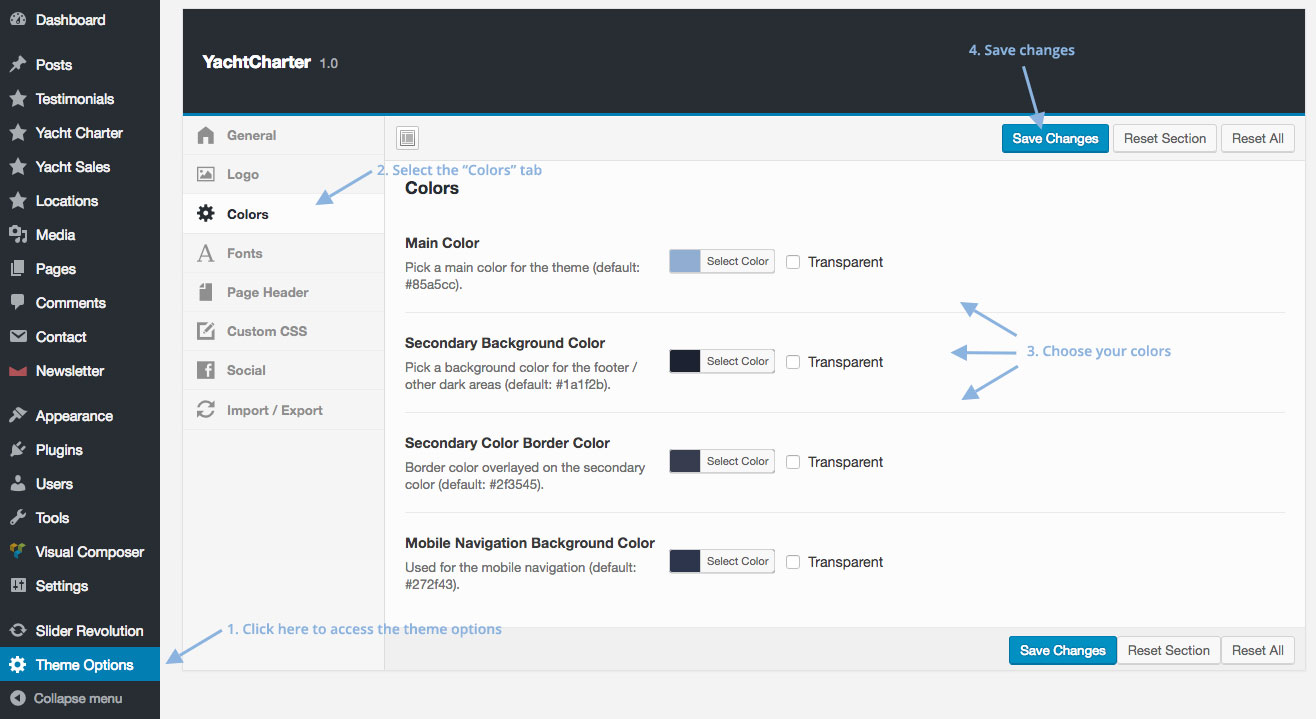
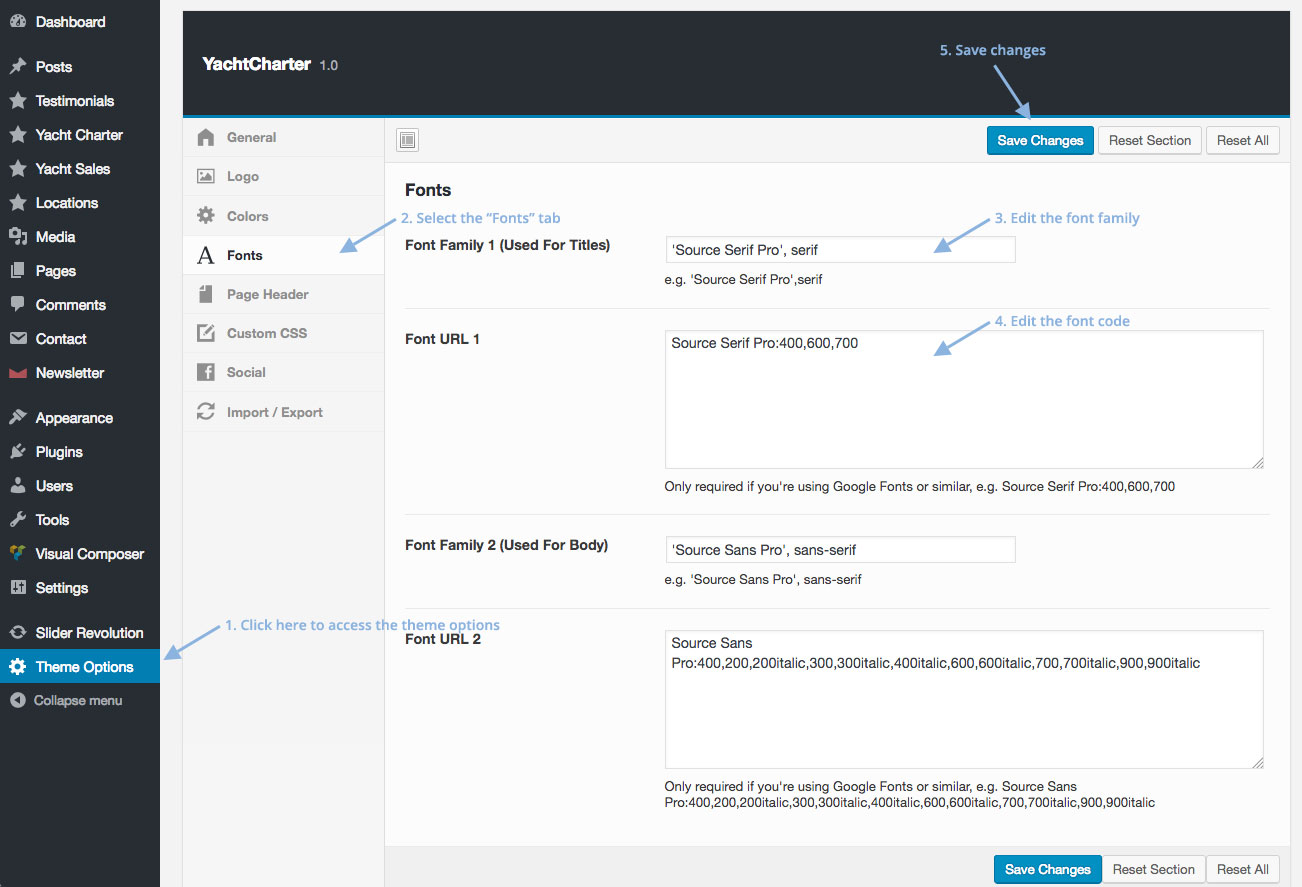
Using The Theme Options
The theme options allow you to edit the style of your website without touching any code, to access the theme options click on "Theme Options" in the WordPress dashboard.
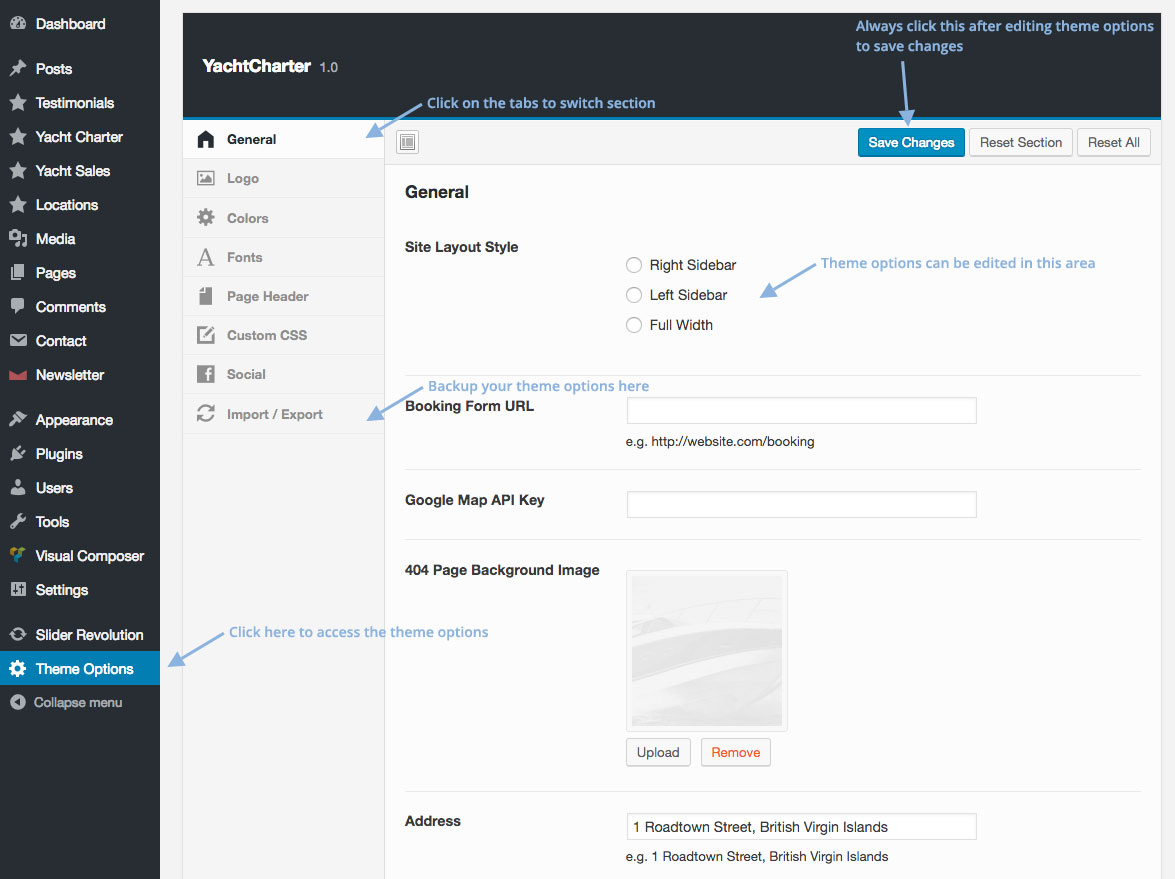
Custom Colour Scheme
You can customize the colour scheme of your website very easily using the built in colour picker options, go to "Theme Options > Colours".
Custom Font
You can customize the fonts your websites uses via the theme options, go to "Theme Options > Fonts". You then need to complete two fields for each font, the font family name and font family URL.
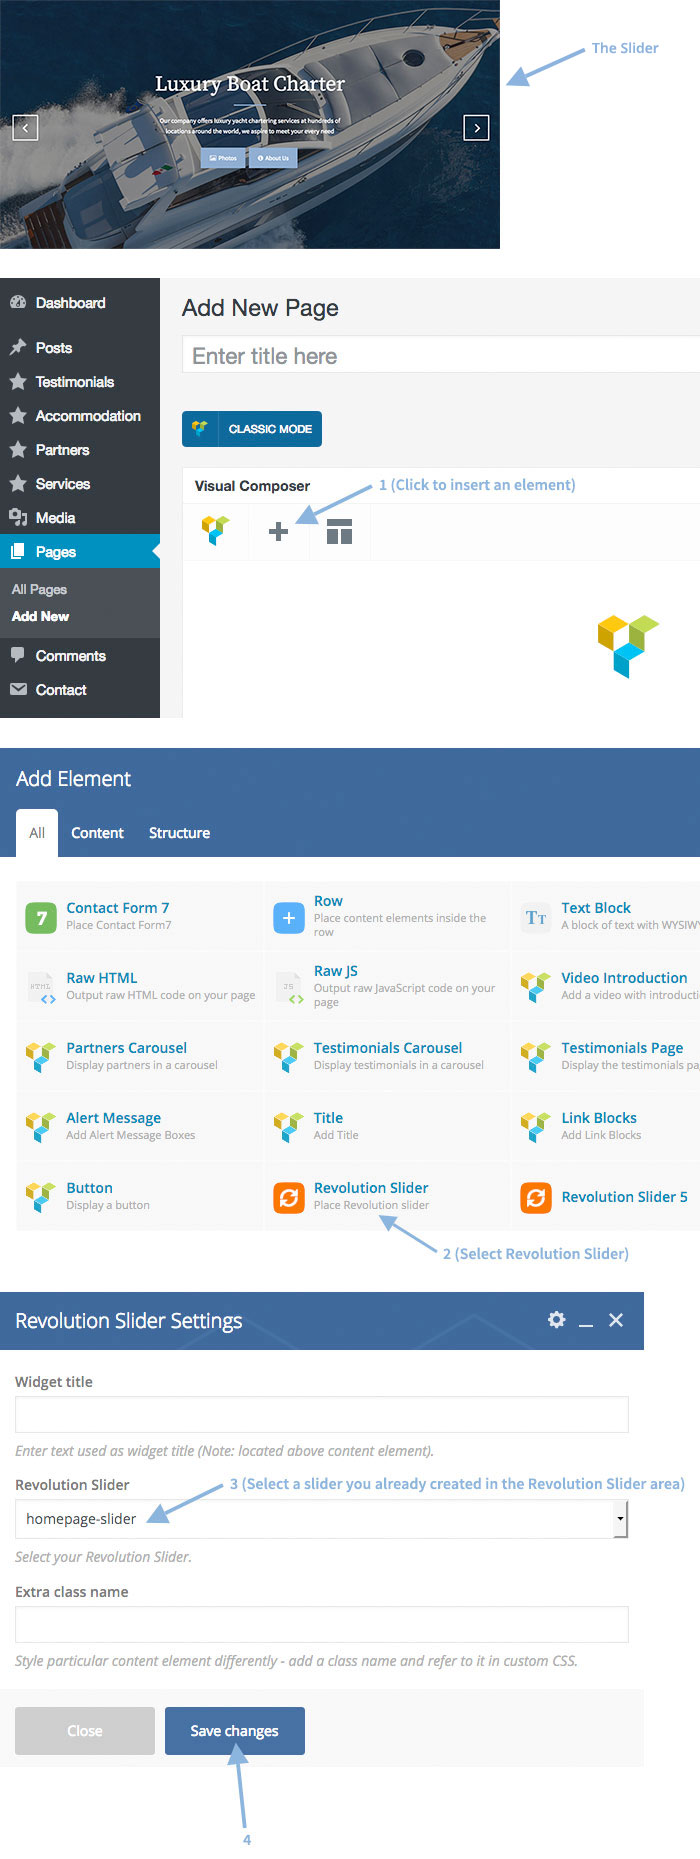
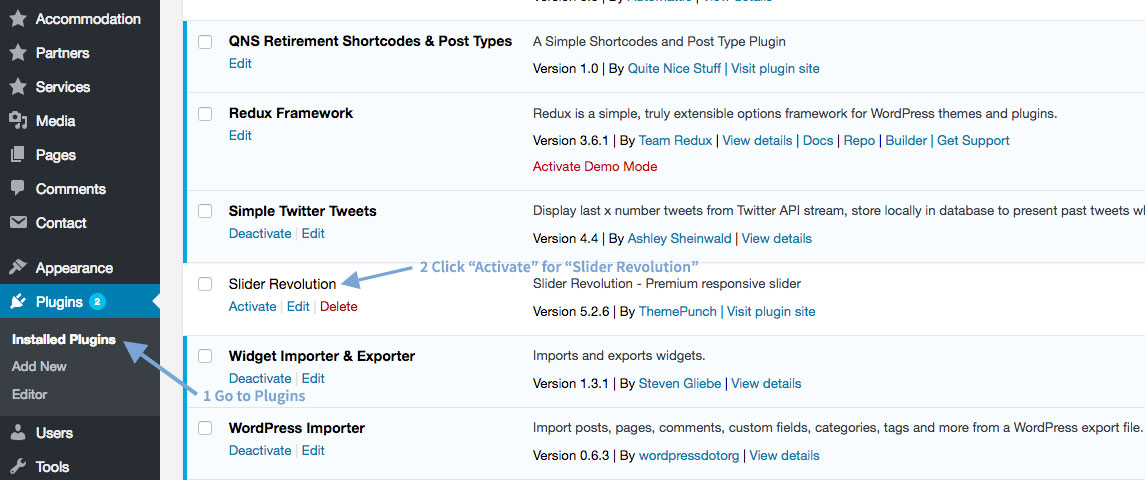
Revolution Slider
The Revolution Slider plugin should already be activated if you followed the "Plugin Installation" instructions in the "Getting Started" section of this documentation. If it's not activated you can go to "Plugins" and click "Activate" for "Revolution Slider".
Importing Example Slides
Go to Slider Revolution and click Import Slider, then click Browse and select the slider-home.zip or slider-accommodation.zip files found inside the Import Data folder inside the main download package (you will need to import both files separately)
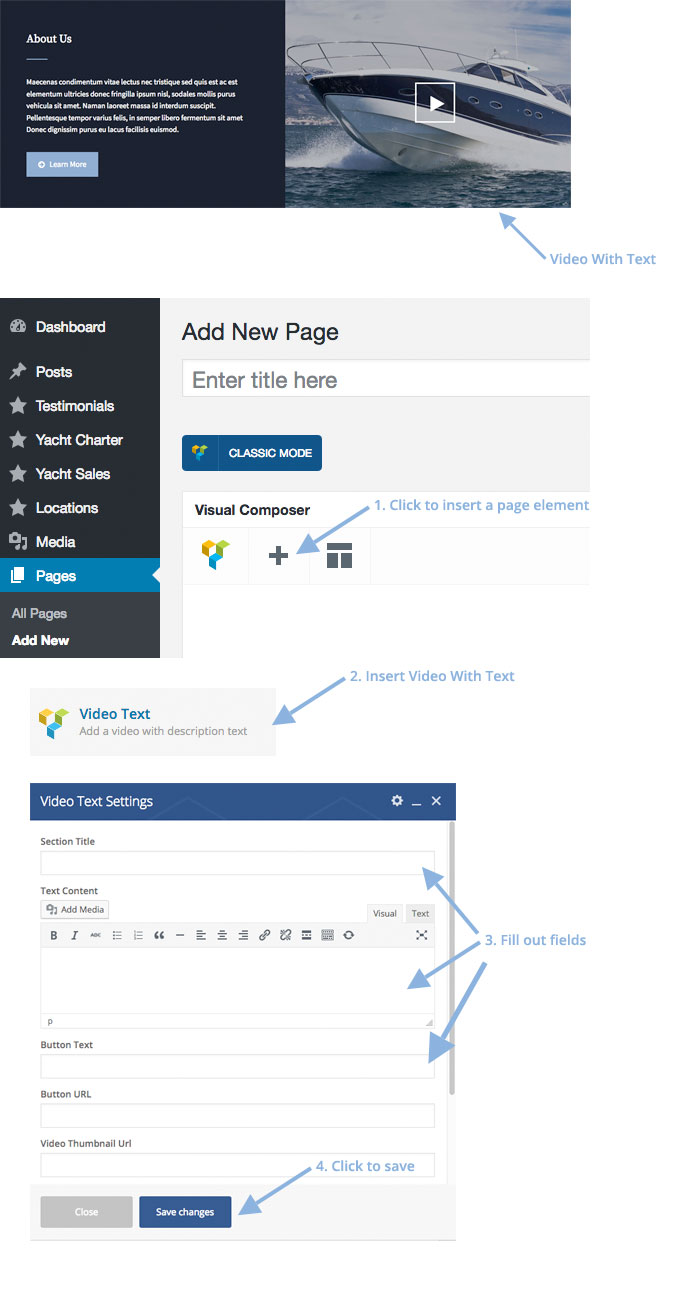
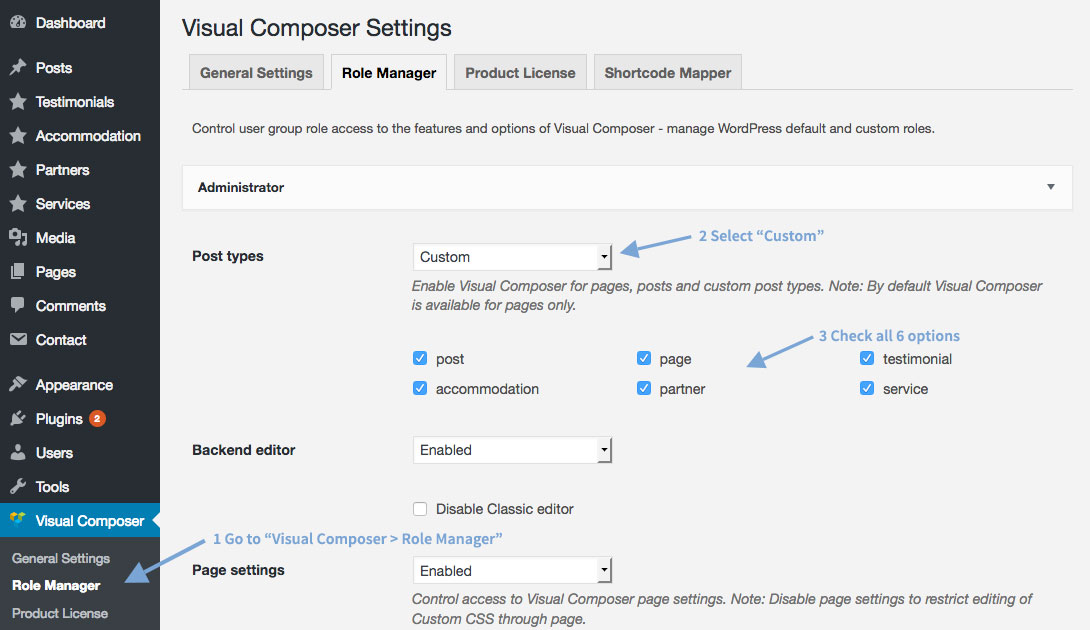
Visual Composer
The Visual Composer plugin should already be activated if you followed the "Plugin Installation" instructions in the "Getting Started" section of this documentation. If it's not activated you can go to "Plugins" and click "Activate" for "Visual Composer".
Enable Visual Composer For All Post Types
Go to "Visual Composer > Role Manager" and for "Post Types" select "Custom" and check all the options then click "Save Changes".
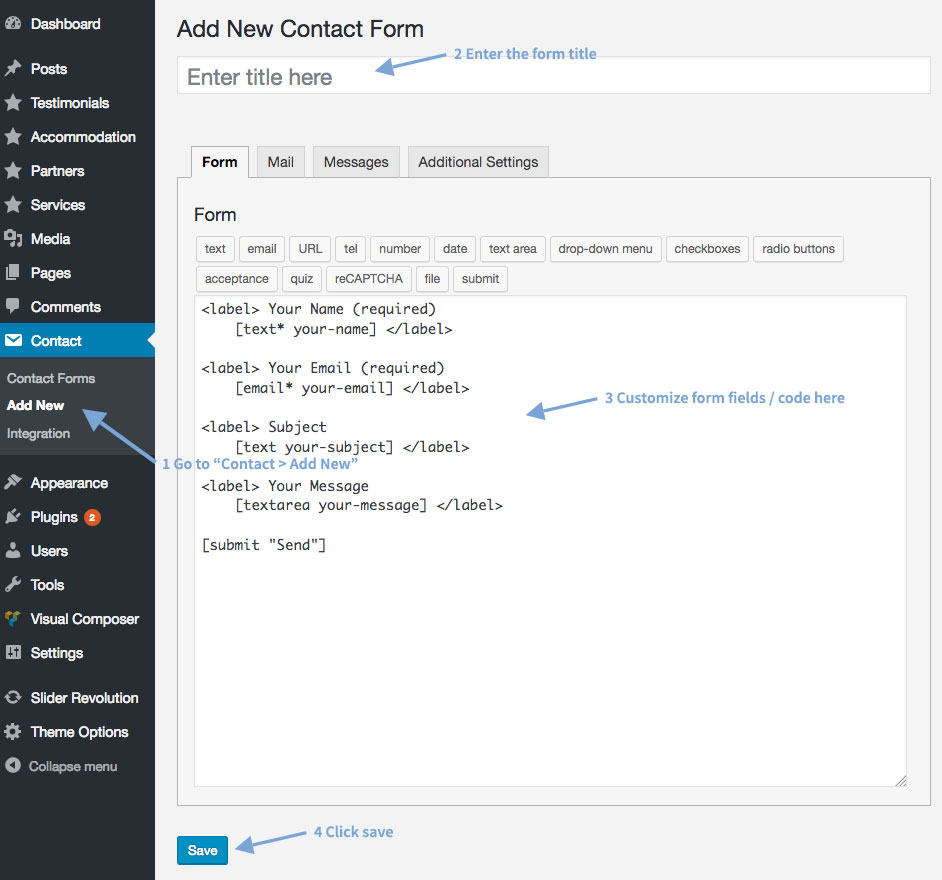
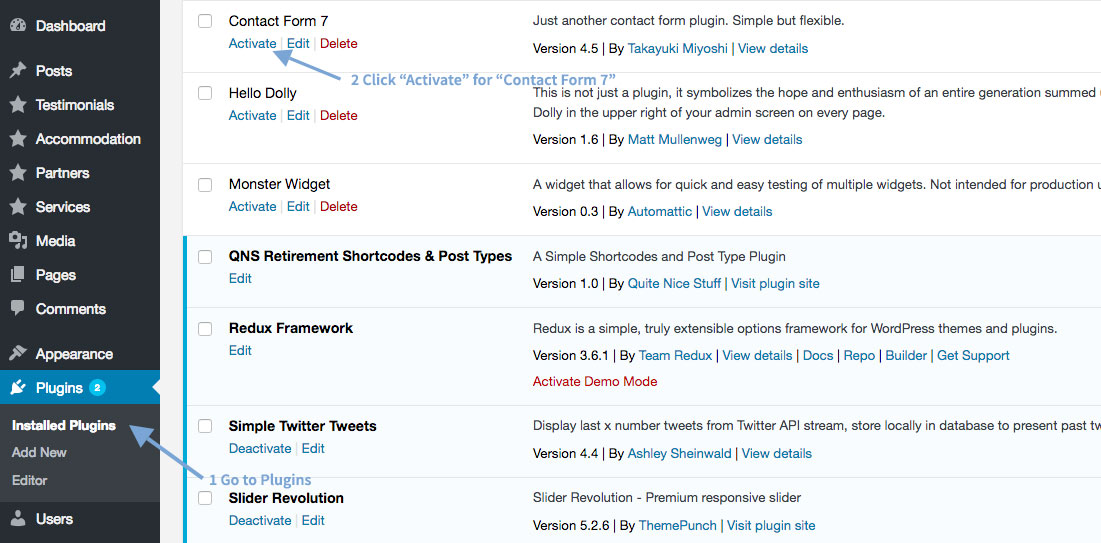
Contact Form 7
The Contact Form 7 plugin should already be activated if you followed the "Plugin Installation" instructions in the "Getting Started" section of this documentation. If it's not activated you can go to "Plugins" and click "Activate" for "Contact Form 7".
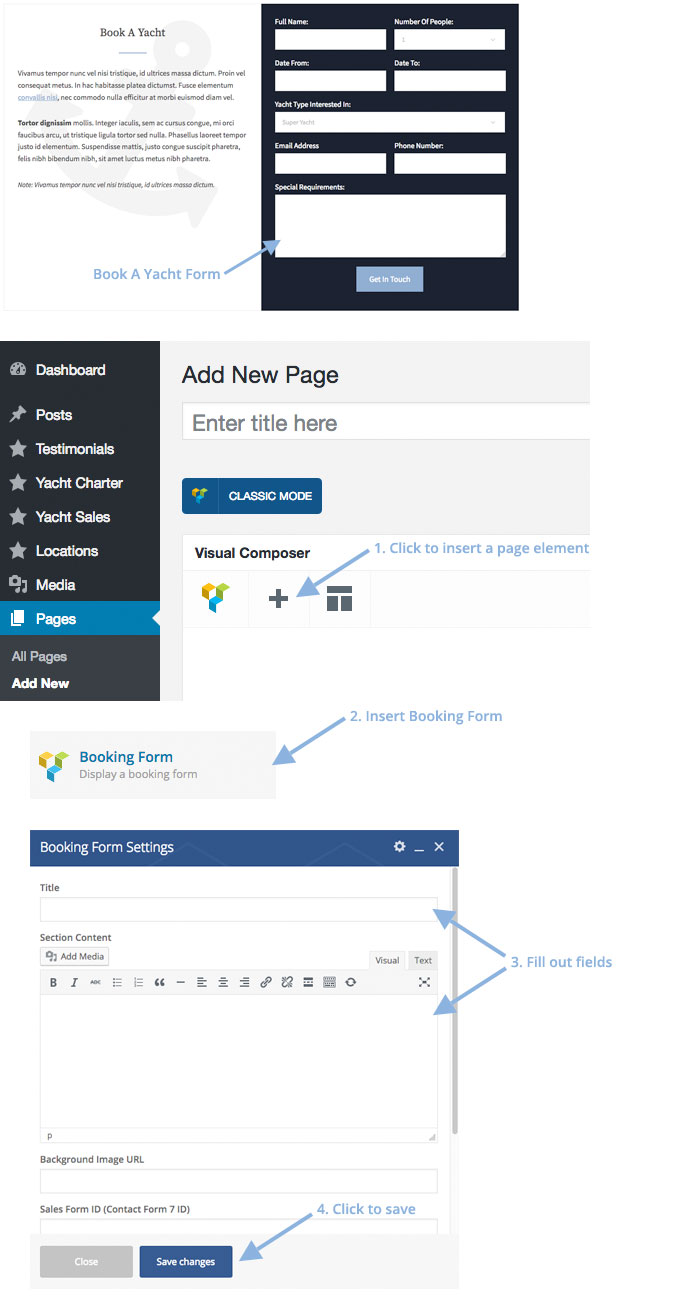
Yacht Charter Contact Form Template
Example Form Code Attached Below:
<div class="clearfix"><div class="one-half"><label>Full Name:</label>[text* full-name]</div><div class="one-half last-col"><label>Number Of People:</label><div class="select-wrapper"><i class="fa fa-angle-down"></i>[select number-of-people class:yacht-form-number-of-people "1" "2" "3" "4" "5" "6" "7" "8" "9" "10" "11" "12" "13" "14" "15" "16" "17" "18" "19" "20" "21" "22" "23" "24" "25" "More than 25"]</div></div></div><div class="clearfix"><div class="one-half"><label>Date From:</label>[text date-from class:yacht-form-date-from class:datepicker]</div><div class="one-half last-col"><label>Date To:</label>[text date-to class:yacht-form-date-to class:datepicker]</div></div><div class="full-width-field"><label>Yacht Type Interested In:</label><div class="select-wrapper"><i class="fa fa-angle-down"></i>[select yacht-type class:yacht-form-type "Super Yacht" "Adventure Yacht" "Cruising Yacht" "Motor Yacht"]</div></div><div class="clearfix"><div class="one-half"><label>Email Address</label>[email* email-address]</div><div class="one-half last-col"><label>Phone Number:</label>[text* phone-number]</div></div><div class="full-width-field"><label>Special Requirements: </label>[textarea special-requirements class:home-booking-form-textarea][submit "Get In Touch"]</div>
Yacht Sales Contact Form Template
Example Form Code Attached Below:
<div class="full-width-field"><label>Full Name:</label>[text* full-name]</div><div class="full-width-field"><label>Yacht Type Interested In:</label><div class="select-wrapper"><i class="fa fa-angle-down"></i>[select yacht-type class:yacht-form-type "Fishing Yacht" "Expedition Yacht" "Motor Yacht" "Sailing Yacht" "Super Yacht" "Classic Yacht"]</div></div><div class="one-half"><label>Size:</label><div class="select-wrapper"><i class="fa fa-angle-down"></i>[select yacht-size class:yacht-option-1 "400ft" "450ft" "500ft" "550ft" "600ft" "650ft" "700ft" "750ft"]</div></div><div class="one-half last-col"><label>Colour:</label><div class="select-wrapper"><i class="fa fa-angle-down"></i>[select yacht-colour class:yacht-option-2 "White" "Grey" "Blue"]</div></div><div class="one-half"><label>Email Address:</label>[email* email-address]</div><div class="one-half last-col"><label>Phone Number:</label>[text* phone-number]</div><label>Special Requirements: </label>[textarea special-requirements class:home-booking-form-textarea][submit "Get In Touch"]
Standard Contact Form Template
Example Form Code Attached Below:
<label>Name <span>*</span></label>[text* your-name] <label>Email <span>*</span></label>[email* your-email]<label> Subject</label>[text your-subject]<label>Message <span>*</span></label>[textarea your-message class:contact-textarea1][submit "Submit"]